|
An Introduction to the Medication module
Whether completing a clinic patient evaluation, a hospital admission history and physical, a discharge summary, a hospital order set, a disease management tool, or a nursing home visit, one of the key elements of excellent documentation is an accurate, complete and current list of medications
In addition, it is imperative that discrete, objective and clear directions for use be included in the medications list. Terms such as "as directed" and "prn," are ambiguous and not helpful, particularly for critical medications such as insulin and coumadin.
The term "SIG" refers to the directions for the use of a medication. Derived from Latin the archaic references in patient medication instructions provide opportunities for medication errors, therefore there is a national effort to eliminate the old Latin "SIG" codes and replace them with English language equivalents, i.e., instead of saying "1 po qid," the new English Language "SIG" code will state, "one by mouth four times a day."
Again, imprecise terms such as "as directed," are never to be used under any circumstance for any reason. The term is meaningless to anyone but the person who gave it, and after a few days, that person would not be able to consistently determine precisely what he/she had told the patient. And, the term does not give the patient or pharmacist clear and precise directions for how the medication is to be used. And, if the term "prn" is to be used, it must be accompanied by the frequency and the indications for the "as needed" directions, i.e., instead of "prn," the SIG code should be "one tablet by mouth every three to four hours as needed for pain."
NextGen's Medication Module has two "windows" for detailing the directions for the use of any medication:
- SIG: this is a limited-space window in which the traditional Latin SIG is placed, i.e., 1 po qid. The system will require you to place such a SIG code in this window in order to properly complete a prescription.
- SIG desc: this is a space with much more capacity in which a precise, English-language description of the medication instructions should be placed, i.e. one tablet by mouth four times a day.
Both SIG codes will appear on all of the various documents – prescription, Rx Sheet, chart note, discharge summary, nursing home note, disease management follow-up notes, etc. – which are generated through NextGen.
Using the medication module
The Medication Module is accessed from the NextGen Main Tool Bar. The Main Tool Bar is displayed by the following steps:
- Open a patient’s chart in NextGen.
- Make sure the visit is not a locked visit.
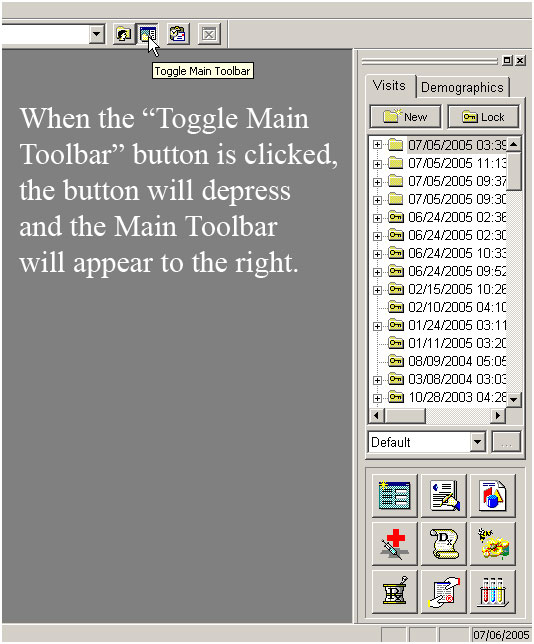
- At the top of the NextGen screen and to the right, you will see four buttons which are beside the space where the provider’s name appears.
- If you place your cursor over the second button, its name will appear: "Toggle Main Tool Bar."
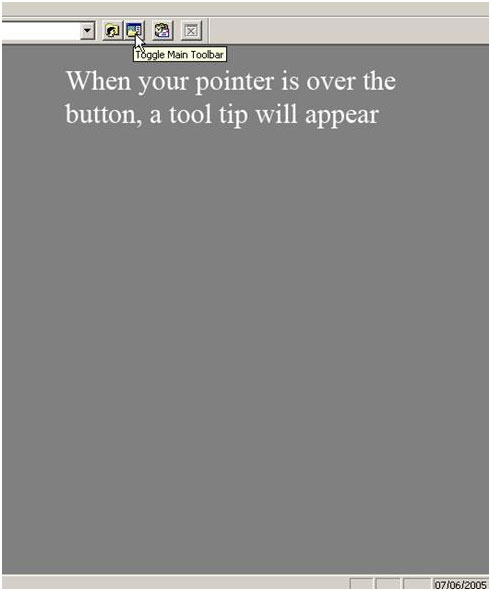
- When the bar is closed, clicking on this button will open it; when it is open, clicking on this button will close it.
- When navigating through NextGen, you should close the Main Tool bar except when using:
- The Medication Module
- The Allergy Module
- The laboratory Module
- The Template access button
- The Document Generator
To learn more about Navigating within NextGen - Click Here
Now that the Main Tool Bar is displayed, you will see nine icons at the bottom.
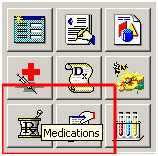
Click on the Icon at the bottom left of the nine which has a "Rx" on a symbol which looks like a Mortar and Pestle. Once again, if you place your cursor over the icon and leave it there for a second, the name of the Icon will appear.

Clicking on the Rx Icon launches the Medication Module.
In the window at the top of the Module, you will see a list of medications which the patient is one, or has been on. In a bar across the top of this window there are a number of boxes which lists the various elements of the medications which are documented in the window below.
In order to see all of these you have to scroll to the right.
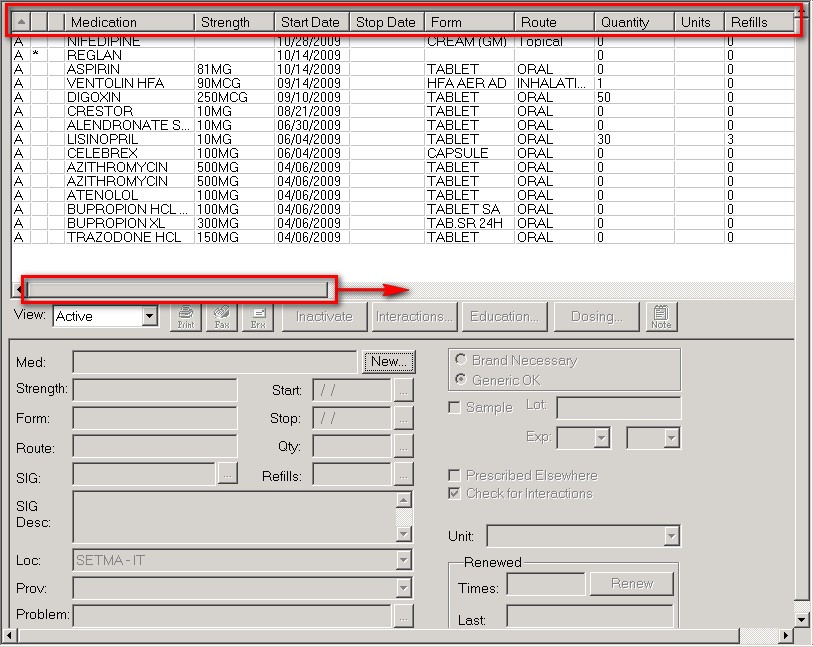
The following names appear in this row and are the results of the functions which are discussed below:
- Medications
- Dose
- Start Date
- Stop Date
- Form Route
- Quantity
- Route
- Units
- Refill
- Generic
- Sample
- Times Renewed
- Dates Last Filled
- SIG
- SIG Description
- Location
- Provider
- Note
- Diagnosis
- S
- F
- O
- Override Text
In addition to providing a wealth of information about each drug that is prescribed for a patient, these buttons can be used to sort and display the medications in any order you wish.
For instance, if you click on "medication" the list will be sorted alphabetically; if you click on "start date," the medications will be displayed in the order of their "start date," and so on.

The Toolbar below the Medications Window

Underneath the window which displays the medications, there is a toolbar with the following functions:
- View – when you click on the arrow to the right of the window a pick list appears with the following options:
- All – when this choice is selected any medication which has been prescribed for this patient, whether active or inactive, will appear.
- Active – when this choice is selected only those medications which are presently being taken by the patient will appear.
- Inactive – when this choice is selected only those medications which have previously been prescribed but which are not now being taken by the patient will appear.
- Active or Pending – when this choice is selected both the active medications and those in the process of being prescribed will appear.
- Print – this will print the prescriptions which you have ordered for the present evaluation in a crystal report format.
- When you click "print," a pop-up appears which requires you to enter your personal identification code, which is your password for accessing NextGen. This represents an acceptable electronic signature.
- After entering your personal code, a prompt will appear which asks if you wish to print all prescriptions for this encounter or only the one which is highlighted.
- Designate "selected medication only" or "all medications for this encounter" and then click the "print" button.
- There is a "preview" function on the above mentioned pop-up which allows you to view the medications which you are about to print if you chose to do so.
- Then click "OK" and your prescription will print on the default printer.

- FAX – this enables you to FAX a prescription to a pharmacy.
- When you click on this button, a pop-up appears entitled "NextGen Fax Options," where you are asked whether you want to FAX all medications from this encounter or only the medication which is highlighted.
- Select the function which you wish to complete
- You are also given an option on this pop-up where you can "preview" the prescription which you are about to FAX to make sure that it is correct before you send it.
- When you click "OK" on this pop-up, another pop-up entitled "Print" will appear. Click OK on this pop-up and another pop-up will appear entitled "Send Fax"
- At this point a pop-up appears entitled "Select Pharmacy." By clicking the button to the right top of the pop-up a list of all area pharmacies appears. You can use the "search" function or scroll down until you find the patient’s pharmacy. Click on it and all of the necessary information populates the "Select Pharmacy" pop-up.
- Click send and the prescription will be FAXed to the pharmacy
Note: While we are able to FAX prescriptions to pharmacies, at present most pharmacies are not set up to receive FAX prescriptions, so we are not using this function.

- Inactivate – this button places an "I" beside the prescription and places it in the "inactive" list which will appear in the medication window after the "active" or currently prescribed medications. This function allows you to maintain an accurate and complete record of the patient’s prescription history easily and efficiently.

- Interactions – this button launches the NextGen function which indicates if any of the medications you are prescribing interact with any other medications, and, if the patient’s allergy history has been completed, it indicates whether or not the patient is allergic to this medication, or to an ingredient in the medication.
When the interaction button is executed and when there is an interaction between the highlighted medication and another medication which has been prescribed for the patient, and/or the patient is allergic to the medication, a pop-up will appear giving the following information:
Patient Allergy -- with a description of the medication which the patient is allergic to. The significance is always a level 1 for a patient-specific-medication allergy.
Drug/Drug interactions – a list of the medications which interact with one another if any. The following information is given:
- Conflicts with – the medication with which the selected medication interferes will be identified here.
- Description – the nature of the conflict with the identified here.
- Start Date
- Stop Date
- Effect – a code is given here with three letters. This can be ignored as the full description of the effect is given as indicated below.
- Level – levels 1 to 3 are given. Level 1 and 2 are very important and should rarely be ignored if ever.
If you click on the information which is displayed in this window, the nature of the interaction appears at the bottom of this window with both the effect and the level being described in detail.
Also, the button entitled Monograph will be activated so that you can print a document which will give more detail about the interaction between the two medications.
There are three levels of interaction which are noted by NextGen. They and their description and significance are:
- Level 3 -- Possibly significant – conservative measures are recommended until more known (little clinical date exists)
- Level 2 – Significant – assess risk to patient and take action as needed
- Level 1 – Most significant – action to reduce adverse effect of interaction is usually required.
Remember, Level 1 cautions should not be ignored and should rarely, if ever, be overridden.

- Education – this button launches a monograph on the medication which is highlighted. This gives enough information to help a patient but is not the complete prescribing information for a medication and should not be relied upon by the provider who is unfamiliar with the particular drug.

- Dosing – this button launches a pop-up with describes the name and dose of the drug being prescribed. The age range for use of the medication, along with the following information is given:
- Minimum dose quantity
- Minimum dose units
- Maximum dose quantity
- Maximum dose units

- Note – this is a "read only" function which displays the note which was created at the time of the original prescription if any. (see below)

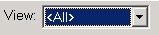
Selecting Medications and the Prescribing and Sig Code Function of NextGen
This is the heart of the medication prescribing module in NextGen. There are three rows of functions and/or elements of the prescription module.
- Down the left hand side of this section, the first column contains the following elements of the prescription:
- Med – here, the medication which is highlighted in the medication window above will appear.
- Dose – this displays the particular dose of medication selected by the above process, i.e., 125 mg of the medication Amoxicillin.
- Form – this defines whether the medication is liquid, capsule, tablet, etc.
- Route – this defines the route of administration, i.e., orally, rectally, etc.
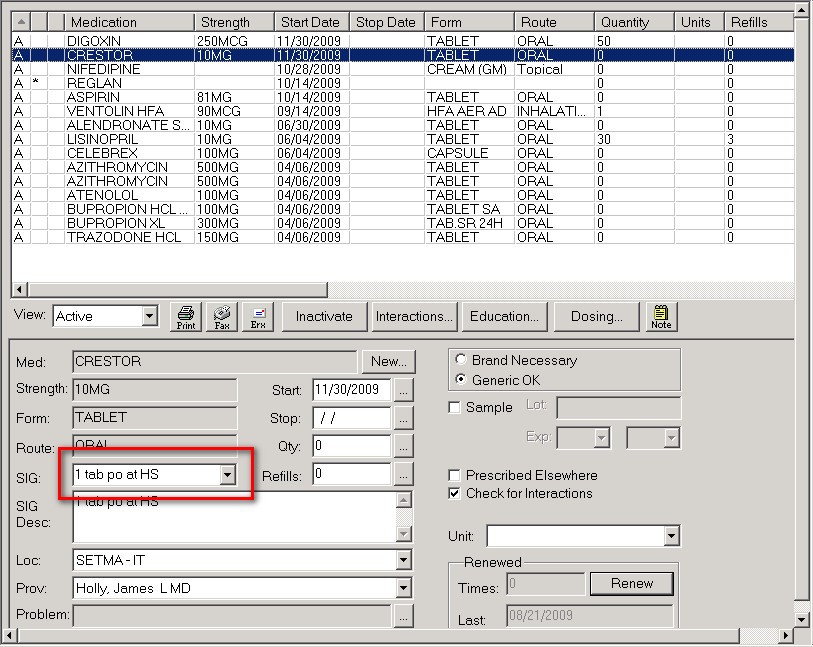
- Sig – this window allows for a brief description of the directions for use and/or administration of a medication.
- Sig Desc – this window allows for a longer description and should be in English, i.e., one tablet by mouth four times a day. For complete information on the use of this function see below.
- Loc – this tells the location where the prescription was issued, i.e, SETMA I.
- Provider – this documents who the provider is who authorized the prescription.
- Problem – SETMA is not using this function but if we maintain a problem list in NextGen by their system, it would be possible to designate that the prescription is for a particular problem.
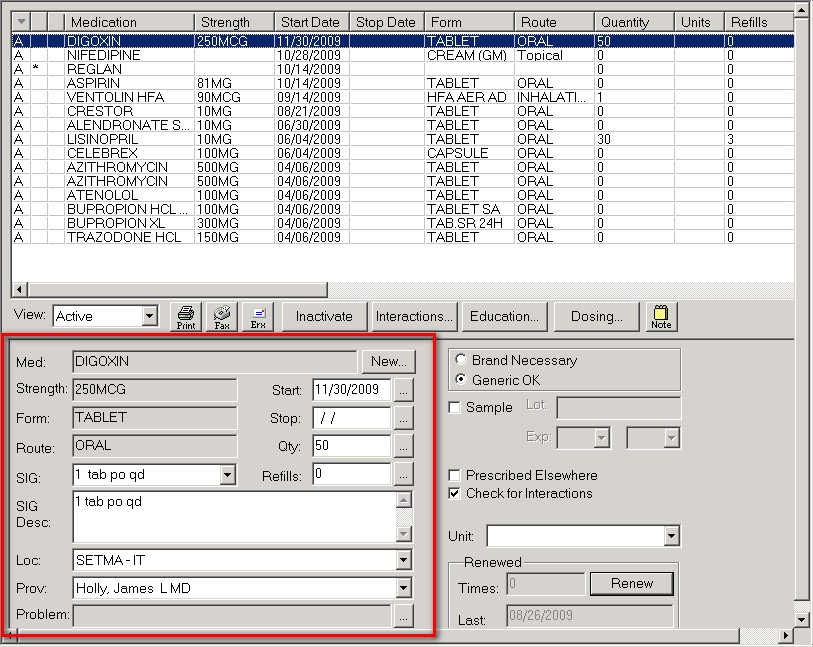
- The next column of functions contains:
- New – When the "New" button is clicked, a window opens which has the following on it:
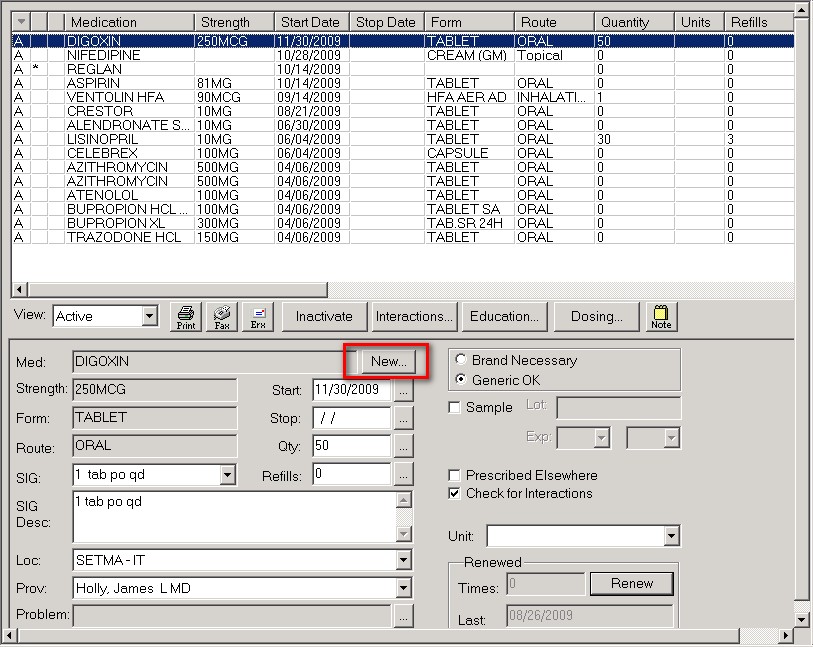
- Brand Name – by checking this box, the medication list will only display brand named medications.
- Generic Name -- by checking this box, the medication list will only display generic names of medications
Note: If both boxes are checked both brand and generic names of medications will be displayed in the window below.
- Medication List
- By Clicking in the window above the name "medication list," you will be able to type in the first few letters of the name of the medication which you wish to add.
- After typing in the first few letters of the medications name, click "Search."

- The medications with that string of letters in the beginning of its name will be displayed.
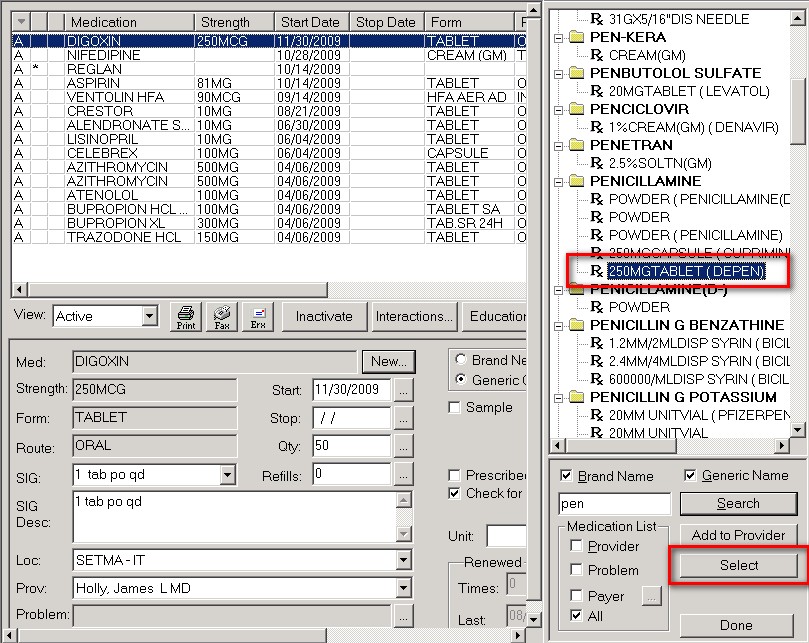
- If you click "search" without putting the name or the first few letters of the name of a medication, the following pop-up will appear. There is a big question mark with the following statement, "You did not specify any selection criteria. The result may take a while to load. Continue?" There are three buttons: Yes; No; Cancel. If you click "yes," the entire PDR will display. If you click "no" or "cancel," you will be returned to the select medication module.
- Once a list of medications appears, you will double click on the one you wish to select or highlight it and click the "select" button
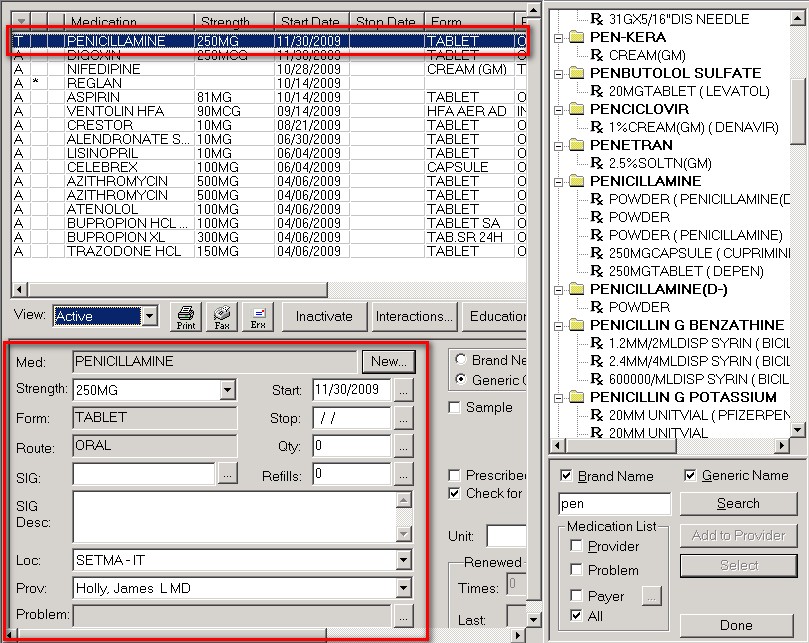
- Once you have completed this, click on the "done" button and this window will close.
- You can always reopen it simply by clicking on the "New" button again.
Note: Upon occasion, the "New" button will not highlight. In this case, simple "work around it, by finding a medication which has been discontinued, highlight it, click the "renew medication" button in the third column. This will activate the "New" button. You then go to the Top Tool Bar across the top of the screen. With the medication highlighted which you used to activate the "New" button, go to File and select "Delete." This will delete the undesired medication while the "New" will now allow you to add the desired medication.
- Provider -- SETMA is not now using this function but it allows us to build a provider designate list of medications. When that function is used, you click here, select the provider name and that provider’s list of medications will be searched and not the entire PDR.
- Problem – SETMA is not now using this function but it allows us to build a problem specific list of medications, i.e., for acute sinusitis. When this function is active a list of problems would appear. Upon selecting the appropriate problem only the medications used for that problem would appear.
- Payer – SETMA is not now using this function but this allows NextGen’s payer formulary to be used. In a future upgrade this function will work.
- All – By checking this box, all medications will be displayed as defined by the choice of brand, generic or both.
- Search – This initiates the search based on the name or partial name which has been typed into the medication search window described above.
- Done – This closes the medication selection window.
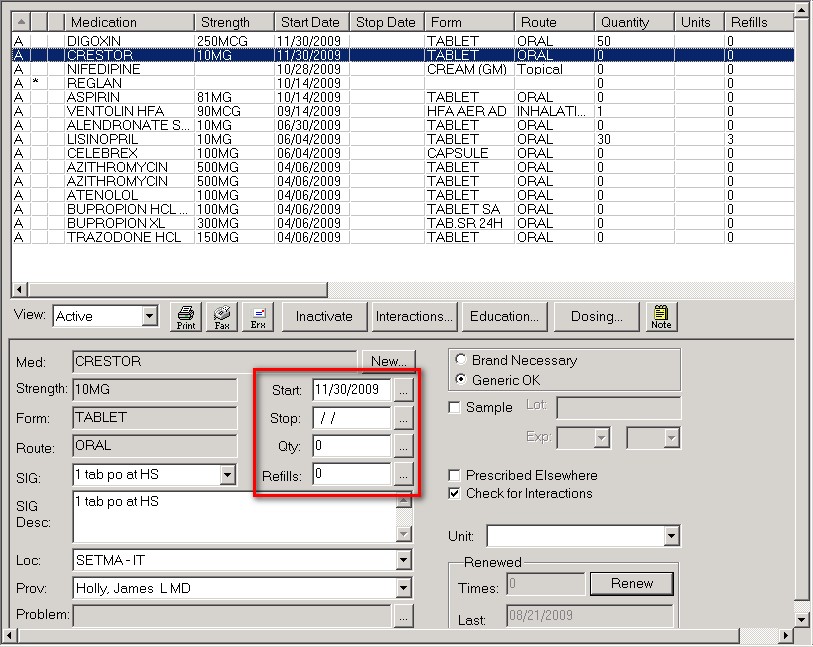
- Start – the date on which the prescription was issued. The current date is automatically selected by the system for a new or renewal medication.
- Stop – the stop date, if designated, for when the medication should be discontinued. A stop date can be added by clicking the button to the right of the Stop date window and adding the appropriate date via the calendar which appears.
- Quantity – the number of pills, tablets, capsules, suppositories, etc., which were authorized to be issued to the patient. The number of pills, etc., can be designated by clicking the button to the right of the quantity window and using the number pad which appears.
- Refills – the number of refills which are authorized if any. The button beside this window triggers a number pad which allows the number of refills to be added. Remember, for most medications, to determine how many pills you have given, you must multiple by quantity by the number of refills + 1, i.e., if you give 90 pills and 3 refills you have prescribed 90 x 4 or 360 pills.
- The third column contains:
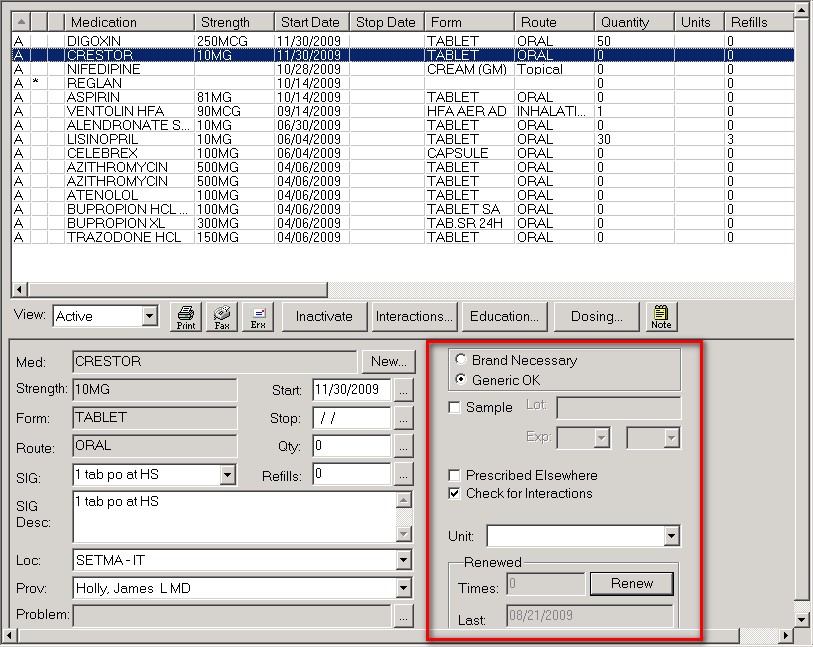
- Brand necessary -- this will mark indicate that you intend for the patient to receive only the brand name of the medication.
- Generic OK – this will indicate that you will allow substitution of a generic.
- Sample – this indicates that you gave the patient samples of the name and quantity indicated on the prescription.
- Prescribed elsewhere – this indicates that the prescription was issued by another person.
- Check for interactions – this triggers the checking for interactions. See above.
- Unit – by clicking in this window a pick list appears which will allow you to indicate the packaging in which the medication is dispensed: ampoules, bottles, packets, suppositories, Tubes, units, vials.
- Last Renewed – this function will tell you when the medication was last renewed.
- Times Renewed – this function automatically tells you how many times the medications have been renewed.
- Renew Prescription – this function will automatically renew the highlighted prescription.
SIG Code Generator
After you have used a medication, the computer will remember the SIG code or codes which you have used with that medication. Therefore, a SIG code will often be automatically selected for you.
Note: Don’t forget that the SIG codes must now have English expression sin the SIG Code Desc field rather than Latin.
Which ever of the below methods you use to designate a SIG Code, the SIG Code Description needs to be changed to an English language expression, i.e., "one capsule by mouth two times a day," rather than "1 po bid." See above.
If you have not used a medication before or if you have giving new and unique instructions, you will need to use the SIG code builder to create a new SIG code. There are three different ways to do this.
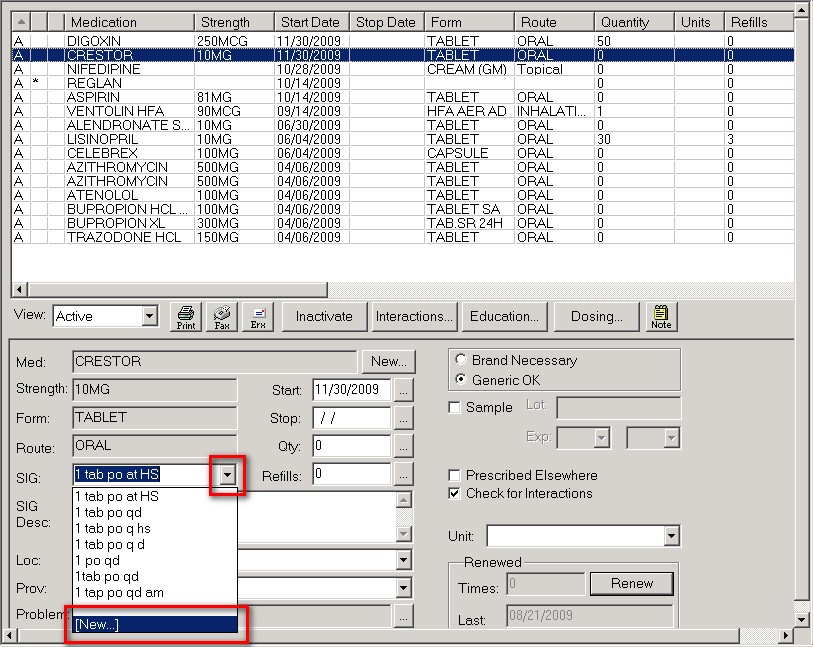
- First, by clicking on the arrow to the right of the medication name, you will display all of the SIG codes which have been used with this medication. If one of them is the correct one, click on it and it will be added as your SIG code for this medication at this encounter.
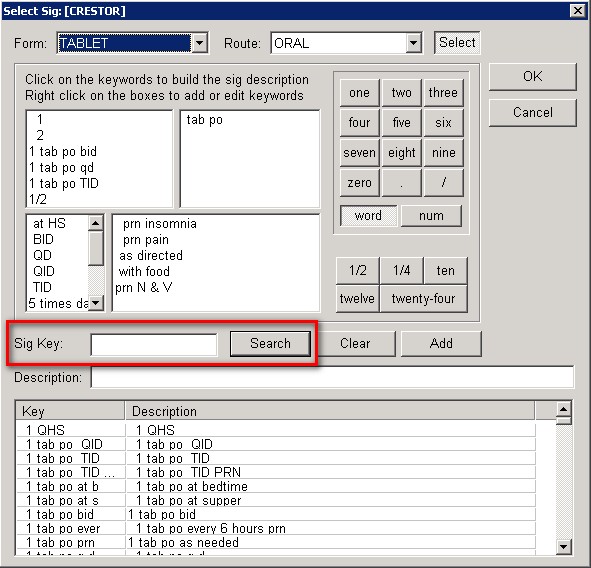
- Second, when you click on the above mentioned arrow, at the bottom of the list of SIG codes there is a button entitled "New." When this appears you can obtain a new SIG Code by:
- Entering a SIG code into the SIG Key space and clicking on Search.
- You can then select a SIG Code from existing ones by scrolling down among those displayed by the action above.
- Third, if there are new previously used SIG codes for this medication (method one above), and/or if there is no SIG Code in the list which has been generated over the past seven years of our use of NextGen, there are two methods for generating new SIG Codes
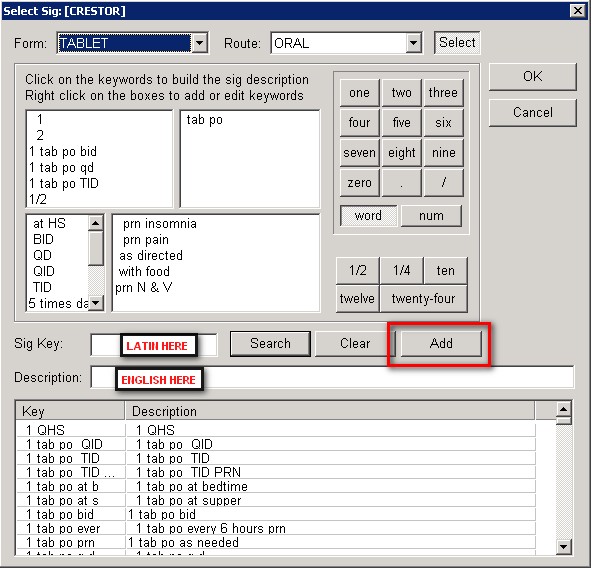
- The first way is after you click on "New" simply enter a new SIG Key in the space provided for that and then enter a SIG Desc in that space. (Remember, make sure that the SIG Desc is in English). Once the SIG Key and SIG Desc are correct, click on the "add" button and this SIG Key and Sig Desc will be added to your prescription.
- The second way is to use the SIG Code builder by following these steps:
- Form – the pick list allows you to designate whether the medication is tablet, capsule, etc.
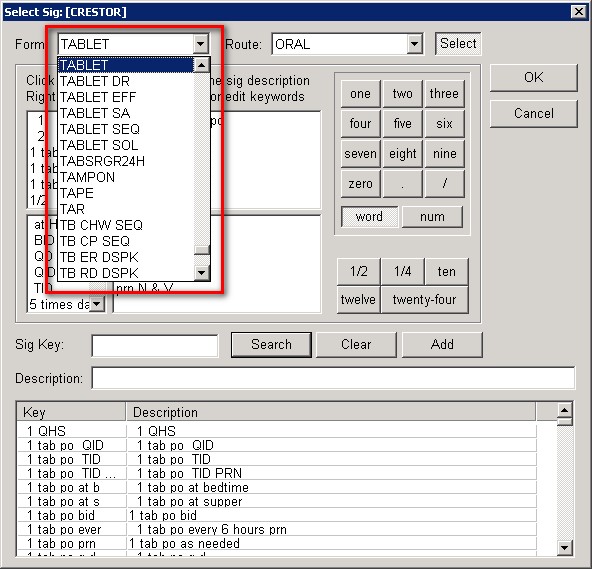
- Route – the pick list allows you to designate how the medication is to be administered, i.e., oral, etc.
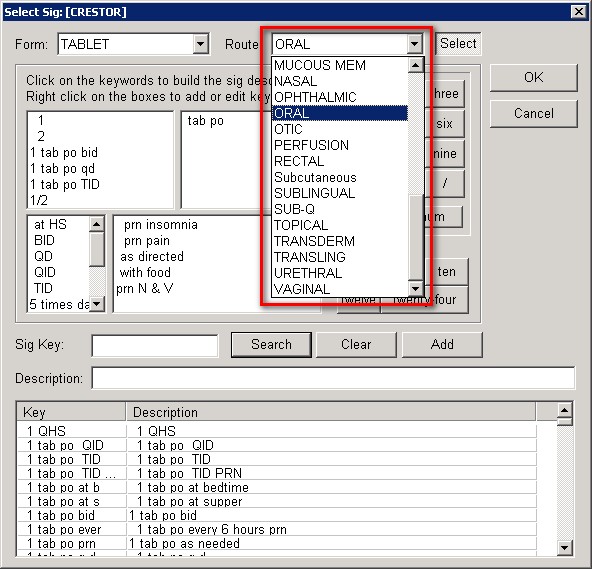
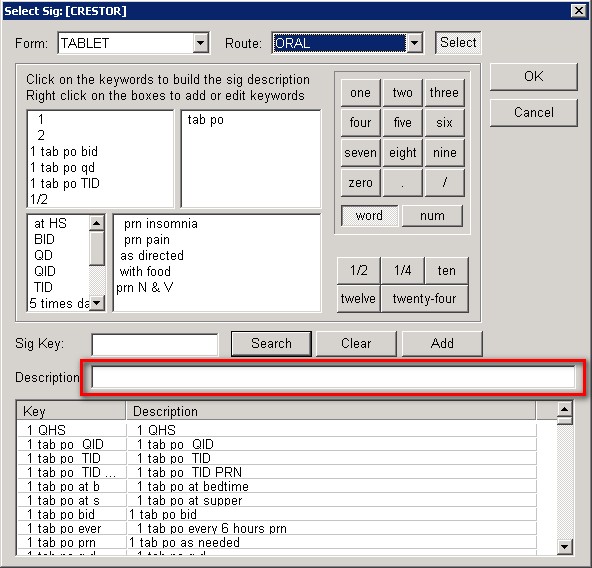
- SIG Desc – the SIG Description can be "built" by clicking on the appropriate boxes at the top of the pop-up which is launched by clicking on the "New" button on the SIG Code. Once the SIG Description is built, the SIG Key can be typed in and this code can be added to by clicking on "add". The biggest draw back to this method of creating a SIG code is that the SIG Description must then be reworded into English.
Note: Through the years of use of NextGen and with multiple providers creating SIG Keys and SIG Code Descriptions, many errors have been created. We are attempting to get the ability to "clean up" the SIG Keys and SIG Code Desc in the system.
General Principles of use of the Medication Module and functions which extend from it.
- The Nursing staff must review the patient’s medications as a part of their check in, EVERY visit on EVERY patient. There is no exception to this.
- The patient must be given an Rx Sheet -- which contains an accurate and updated list of the patient's medications.
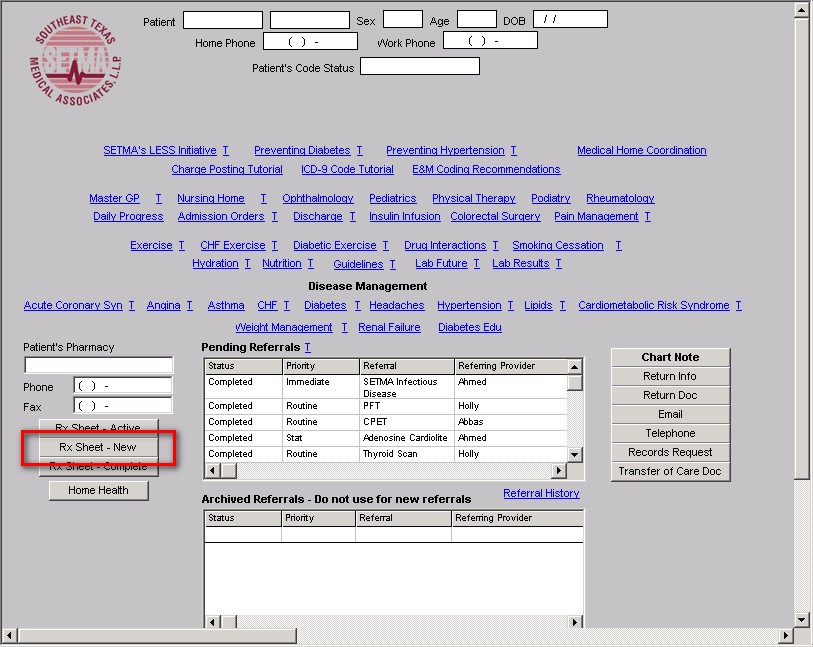
To generate an Rx Sheet, go to the Plan Template or to AAA Home and click on the button entitled "Rx Sheet" at the bottom left of the screen. An accurate list of the patient's current list of medications with name, dose, sig code in Latin and English will be automatically printed. This should be done with every patient, every time they are seen.
- If the description Sig code is in "qd," "po" or other Latin language, the description must be changed to "my mouth," "once a day," etc.
- This function particularly means inactivating medications which are no longer being taken.
- As part of his/her evaluation every provider needs to document on every encounter that the medications have been reviewed AND the medications must be reviewed. Old, discontinued and inactive medications need to be marked as such.
- Imprecise and indefinite Sig Codes such as "As Directed" are NEVER permissible.
- Many Coumadin orders on patients have an "As Directed" sig code. What does that mean?
- Sig codes must be precise and accurate, particularly for Insulin, Lanoxin, Potassium, Coumadin and other medications which have a narrow window between therapeutic and toxic doses.
- Don't forget, the description must be in English.
- Also, a new Federal regulation requires that Sig codes in the hospital be in English, not Latin, i.e., the old code of "1 po qod," is not acceptable. The directions must state "one by mouth once every other day."
Until you have modified the Sig codes you most often use, you will have to, rather laboriously, place the correct English translation of the Sig code in the "Description window" on the Medication template. This now prints on the prescription form, on the chart note, on the Rx Sheet and on all disease management tools patient follow-up documents.
- Those who are completing H&Ps for hospital admissions must NOT put any chart note on a patient's chart until the sig codes have been updated and until all inactive medications have been eliminated.
- This is particularly true if some of the outpatient meds are not to be continued in the hospital.
- Remember, the meds in the patient's record will appear on the hospital order set.
- Once a correct chart note with all currently prescribed and active medications is generated, the medication list must be modified again before the hospital order set is generated, i.e., if the patient is on Coumadin as an outpatient, that fact and the correct English language Sig Code needs to appear on the admission History and Physical Examination.
- However, if the patient is not to continue the Coumadin in the hospital, once the H&P is generated, the Coumadin must be inactivated so that it does not appear on the Hospital order set.
- All descriptions for medications must have an English language description in the Sig before the hospital order set is printed.
|