|
NextGen’s Tool Bars
NextGen’s Core Content is operated by five bars:
- Title Bar - this is a static bar which names the patient and NextGen EMR.

- Menu Bar - these are the navigation buttons at the top of the NextGen screen which are permanently displayed when a patient encounter is open.

- Top Tool Bar - this tool bar is right under the Menu Bar at the top of the screen in NextGen.

- Main Tool Bar - this tool bar is opened and closed by toggling the third icon from the extreme right of the second line of the Top Tool Bar.
- Images Tool Bar - this tool bar is displayed when the File-New-Images function is accessed.
The Menu Bar
The Menu Bar is the tool bar at the very top of the screen when a patient record is displayed in NextGen. This tool bar is continuously there and cannot be removed, closed or modified. There are nine functions and/or icons on the Menu Bar.

NOTE: Notice the underline letter in each of the menu options. This indicates a keyboard shortcut. By using the ALT Key next to the SPACE bar on your keyboard and the corresponding letter will invoke the MENU option. For example pressing and holding the ALT key while pressing the F key will invoke the File menu option.
Once the sub menu is invoked, the underlined letter can be pressed on the key board without the ALT key to access the function.
The menu functions have the following names:
- File
- Default
- View
- Tools
- Utilities
- Window
- Help
Note: For the purposes of the tutorial, we will only discuss those functions which have clinical significance.
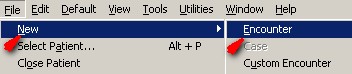
File -This is the first option on the Menu Bar. It is the most extensive function of the Menu Bar and contains twenty-six different options when accessed. Again only those with clinical significance will be discussed here.

- New - when File-New is accessed eleven options are presented. They are:
- Visit - this creates a new visit for today
- Custom Visit - this launches a pop-up entitled "Custom Visit" which allows you to create a visit for a prior date. After closing and reentering NextGen the visit will appear on the Main Tool Bar in its appropriate chronological order. However, if you right click on it, it will tell you the date that the information was actually entered into the computer.
- Addendum - this allows you to create and/or change a chart note, but not the material on a template. If you remember something which you would like to add, change or correct you can use this function. The date and time of the creation of the addendum will be noted thus maintaining the integrity of your chart and of the date therein.
- Lock Visit - this locks the current visit and no further changes can be made to it.
- Group Visit - we do not use this function.
- Patient - SETMA does not use this function
- Coverage - this launches the patient’s demographic and insurance information
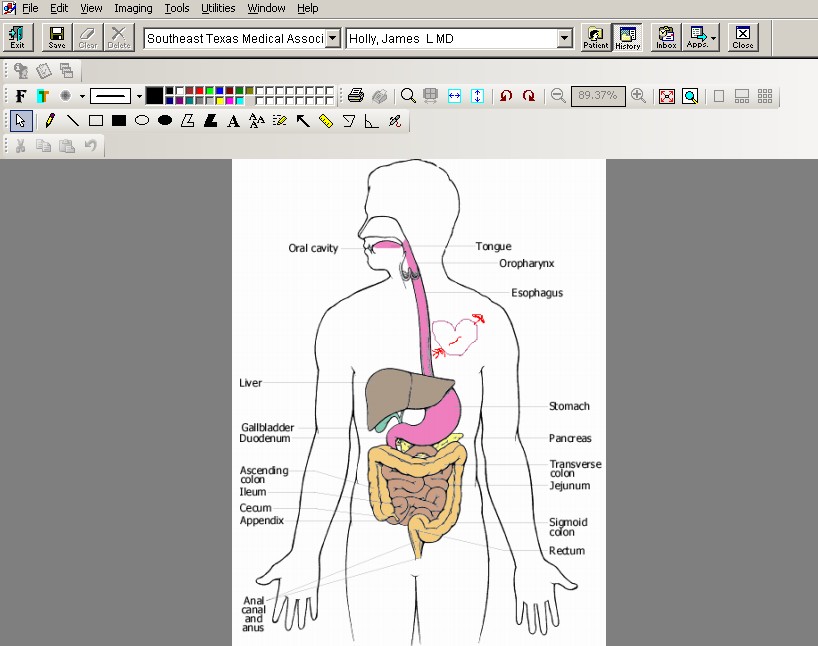
- Image - this is a function which presents a choice of seventeen different images which can be printed for patient education purposes.
- By selecting one of the images on this list, and by using the drawing tools at the top of the screen, it is possible to locate and describe lesions and other abnormalities.
- The imagine tool bar has seventeen functions whose functions are identified by placing your cursor over the icon and the name appears.
- The third will be the most commonly used and it is entitled "Freehand." The icon is a pencil.
- The image can be printed to give to the patient and it can be saved so that it will be available in the EMR.
When an image is load, a new button is add to the menu bar which is rarely used in using NextGen, is a symbol which does not have a named but when accessed this function provides options for seven functions. Restore, Move, Size, Minimize, Maximize, Close, Next. In that none of these functions are used in a patient encounter, they will not be discussed here.
- Template - this launches the "Select Template" pop-up, which is the same function as the top, left Icon at the bottom of the Main Tool Bar.
- Document - this launches the "Generate a document" pop-up, which is the same function as the top, middle icon at the bottom of the Main Tool Bar.
- Referral - SETMA does not use this function as we have our own custom referral template.
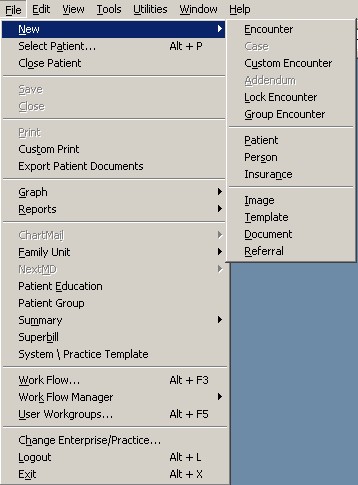
- Select Patient - this opens the Patient Selection function of the Top Tool Bar and functions the same as the fourth button from the extreme right hand side of the Top Tool Bar.
NOTE: This menu option can be invoked by holding down the ALT key and pressing the P key at the same time.
- Close Patient - this closes the patient visit which you are currently in.
- Save - this saves the template which you are currently using.
- Close - this closes the template which you are currently in.
- Print - this prints the document when a document is open it the window.
- Custom Print - this function allows for the printing of large sections of a patient’s record or the entire record.
- Export Patient Documents - this allows for the exporting to a disc and/or to NextMD (not currently used by SETMA) of parts or all of the patient’s record.
- Graph - when this button is accessed six different graphing functions are available. This makes it possible to display an over-time graph of any of the below:
- Templates
- Lab Results - this allows for the display over time in a graph format of any lab value in NextGen’s lab module
- Growth Charts - BMI - this displays the patient’s BMI over time in a graph foremat.
- Growth Charts - Height - this displays the patient’s height over time in a graph format.
- Growth Charts - Weight - this displays the patient’s weight over time in a graph format.
- Growth Charts - Head Circumference - this displays the patient’s head circumference over time in a graph format.
- Reports - SETMA is not currently using this function
- Family Unit - SETMA is not currently using this function
- NextMD - SETMA is not currently using this function
- Patient Group - SETMA is not currently using this function
- Patient Education - this launches seven categories of patient education material which can be printed and given to the patient; they are:
- Adult Health Advisory
- Behavioral Health Advisory
- Eye Advisor
- Senior Health Advisor
- Sports Medicine Advisor
- Women’s Health Advisor
Each of these categories has hundreds of documents which can search for by subject. The documents can be printed and given to the patient.
- Summary - there are seven functions here which take you to the summary of the each of the following:
- Allergies - this shows the summary of the patient’s allergies which is the same as the far right icon in the second row of the nine icons at the bottom of the Main Tool Bar.
- Problems - SETMA does not use this function.
- Procedures - SETMA does not use this function.
- Referrals - SETMA does not use this function.
- Labs - this takes you to the lab module which is the same as the bottom right icon on the Main Tool Bar.
- Medications - this takes you to the Medication Module which is the same as the bottom left icon on the Main Tool Bar.
- Equipment - SETMA does not use this function.
- Superbill - SETMA does not use this function, but you can use this to see the patient’s insurance.
- Workflow - this launches the work flow function which is the same effect of the second button from the extreme right of the Top Tool Bar.
- User Workgroups - SETMA does not use this function.
- Change Company/Department - SETMA does not use this function
- Logout - this takes the provider out of NextGen.
- Exit - this takes the provider out of NextGen
Edit - this is the third button on the Menu Bar

The Edit button contains two functions "edit" and "delete" which are rarely used.
View - this is the fifth button on Menu Bar

There are nine functions attached to this button which allows you to change how your data is displayed. This is never used.
Tools - this is the sixth button on the Menu Bar. There are only two of the eight functions in this set which are useful clinically. They are:

- User password - you are able to change your password using this function
- Preferences - you are able to add templates to your preference list
For more information on Preferences - Click Here
Utility - this is the seventh button on the Menu Bar

- Patient Charts - this is how you access scanned data in your patient’s chart.
Note: Make sure that the patient name is the same as the patient for whom you are seeking information.
Window - this is the eighth button on the Menu Bar
This is not used clinically
Help - this is the ninth button on the Permanent Tool Bar
This is not used clinically
Top Tool Bar
The Top Tool Bar which is right under the Menu Bar consists of 10 buttons and/or boxes. If you place your cursor over the button, its name will appear. These buttons remain at the top of the NextGen EMR no matter what template you are working on The 10 buttons are:

- Logging Out -
 - An icon which is an open door with an arrow pointing through the door. This takes you out of NextGen. - An icon which is an open door with an arrow pointing through the door. This takes you out of NextGen.
- Save -
 - This manually saves the template on which you are working. If you are working with SETMA’s navigation system, i.e., with the Main Tool Bar closed, all templates are automatically saved. - This manually saves the template on which you are working. If you are working with SETMA’s navigation system, i.e., with the Main Tool Bar closed, all templates are automatically saved.
- Clear -
 - This will clear all data from the field on the template which is open. - This will clear all data from the field on the template which is open.
- Delete
- Place of service -
 - A Box for the place of service - A Box for the place of service
- Provider Name -
 - A box for the name of the provider completing the patient evaluation. - A box for the name of the provider completing the patient evaluation.
- Patient Selection -
 - The first button to the right of the space which designates the provider who is completing the visit. This launches a pop-up which allows for the search for the name of a patient by: - The first button to the right of the space which designates the provider who is completing the visit. This launches a pop-up which allows for the search for the name of a patient by:
- Scrolling which is very inefficient
- Typing the first few letters of the last name and first name and then clicking "search"
- Account ID
- Birth date
- Social Security Number
- Medical Number
Note: It is critical to make sure that you are documenting on the right patient. Double check that you are documenting on the correct patient’s chart by checking either the social security number and/or birth date.
- Toggle Main Tool Bar -
 - The second button to the right of the box which designates the provider completing the visit. This opens and closes the Main Tool Bar. - The second button to the right of the box which designates the provider completing the visit. This opens and closes the Main Tool Bar.
- Toggle Work Flow -
 - The third button to the right of the box which designates the provider completing the visit. This opens the Work Flow Module. - The third button to the right of the box which designates the provider completing the visit. This opens the Work Flow Module.
- Close Window -
 - this closes the template which you are currently working on. - this closes the template which you are currently working on.
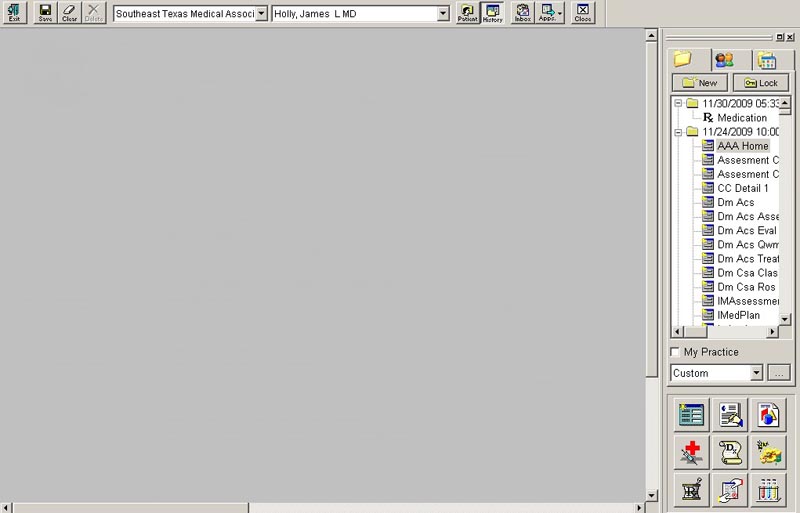
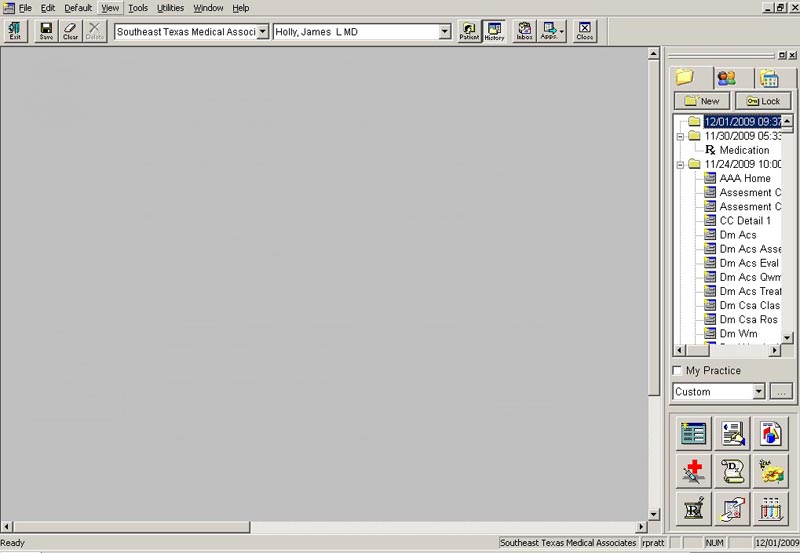
Main Tool Bar
The Main Tool Bar is opened by going to the Top Tool Bar and clicking on the second button to the right of the box which designates the provider completing the visit. The Main Tool Bar will appear along the right hand side of the NextGen window. You must have a patient chart opened in order to launch the Main Tool Bar.
Note: If you are not using one of the functions which is launched from the Main Tool Bar, you should navigate through SETMA’s templates with the Main Tool Bar closed.
At the top of the Main Tool Bar are four buttons:
- Encounters - this displays all visits which have been created in NextGen on this particular patient.

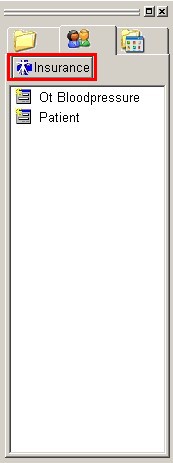
- Demographics - this displays all "demographic templates," which are templates which have data which is copied forward into future visits automatically.
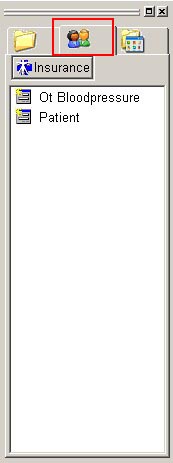
- Clicking the Demographics button also displays another button entitled "Insurance" which once clicked gives you a list of the patient’s insurance coverage and other important information. To return to the four buttons at the top of the Main Tool Bar, click on Visits.
- New - this creates a new visit in NextGen which allows you to document an encounter, note, telephone or other function for today’s date.

Note:If you are seeing a patient in the clinic, do not use this method for creating a new visit as if you do the charges will not flow over into the EPM (the business side of the EMR). If you are seeing a patient in the clinic and discover that there is not a visit for today’s date already there, call the front office or ask your unit clerk to create one for you.
- Lock - this manually locks the visit which is open. The visit is automatically locked in ten days but can be manually locked by this method. Make sure you want to do so for once it is done, it cannot be undone.

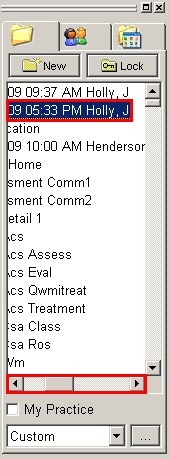
Underneath these four buttons is a window which chronologically organizes all visits for this particular patient. This window allows the following functions:
- If you scroll to the right of the date of the visit, it will tell you whose name the visit was created under.
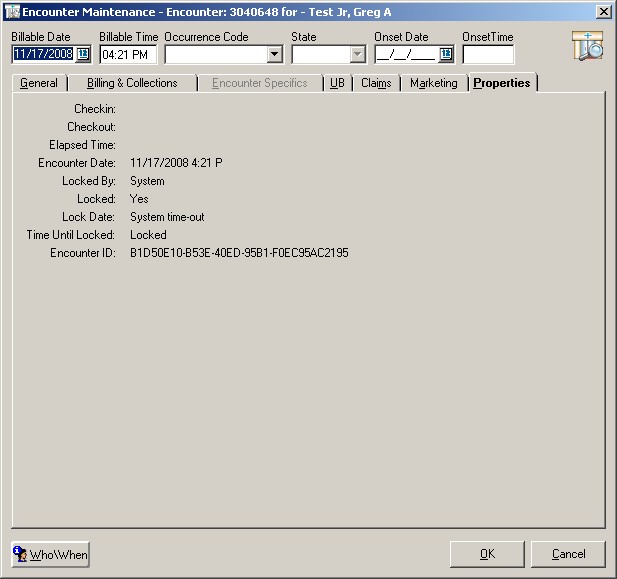
- If you place your highlight the visit with your cursor and right click on your mouse, eight options will appear. If you select the option named "Properties," it will tell you:
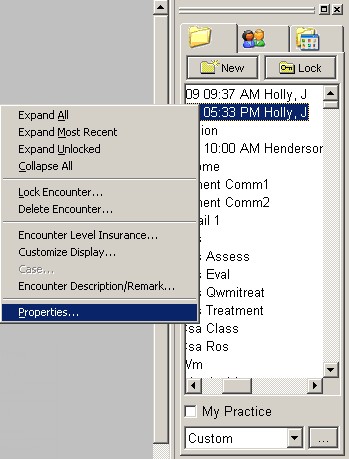
- Type of file which this encounter represents
- The date and time when it was created
- Who created the file
- Provider
- Location
- Facility
- Whether or not the visit is locked
- Locked by - who locked it if it is locked
- How long it remains unlocked if it is not yet locked.
Underneath the window with a list of the visits, there is a window which allows for searching on visits by thirteen different categories.
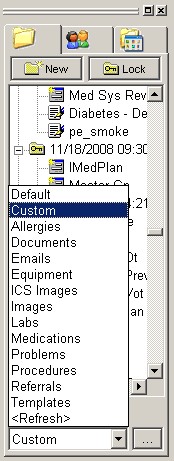
In the window with a list of the visits, there is a + by each visit with content based on the sorting of the visits by the criteria listed below.
If the "default" option is chosen, all visits with any content of any kind will have a + by it.
If the "documents" option is chosen, only those visits with a document or with documents will have a + beside it.
- Default
- Custom
- Templates
- Documents
- Images
- Procedures
- Problems
- Allergies
- Medications
- Referrals
- Labs
- E-mails
This function allows for the efficient finding of a prior visit which contains the information you are looking for.
At the bottom of the Main Tool Bar are nine icons. The names of the icons can be found by placing the cursor over the icon at which point the name will appear. We will only discuss the ones which SETMA uses:
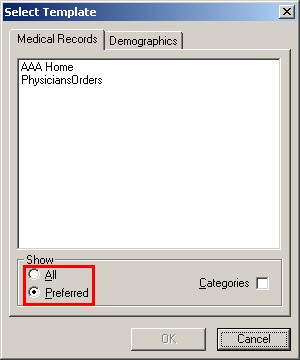
Templates -  - Top left - this launches a pop-up which allows for the selection of the template you want to use. The most efficient way to do this will be from AAA Home but it can be done from here. When the Main Tool Bar Templates Icon is launched, it will display a pop-up with the following organization: - Top left - this launches a pop-up which allows for the selection of the template you want to use. The most efficient way to do this will be from AAA Home but it can be done from here. When the Main Tool Bar Templates Icon is launched, it will display a pop-up with the following organization:
- At the top will be "Medical Records" and "Demographics" This has reference to the kind of templates being displayed.
- "Medical Records" templates do not copy forward and must be completed at each encounter if data is to be captured.
- "Demographics" templates have data which copies forward at each visit.
- If you click on the words "Medical Records" all of the templates displayed will not copy forward. If you click on the word "Demographics" all of the templates displayed will have information which will copy forward.
- Below these categories of templates, there is a window which displays the templates available for use based on your selection of a type of template above and of categories of templates below this window.
- Templates can be sorted by:
- All - this option displays all templates alphabetically
- Preferences - this option displays each providers’ personal options
To learn more about setting up your preferences - Click Here
- Categories - this is not used by SETMA
Documents -  - Top Middle - this is another way of creating a document but with SETMA’s templates there are many easier ways. This is seldom used. - Top Middle - this is another way of creating a document but with SETMA’s templates there are many easier ways. This is seldom used.
Allergies -  - Middle Right - this is how allergies are documented in order to interact with the medication module. Steps of adding an allergy to the list: - Middle Right - this is how allergies are documented in order to interact with the medication module. Steps of adding an allergy to the list:
- Click on the Allergy Icon
- Click on the button beside the space labeled Allergy
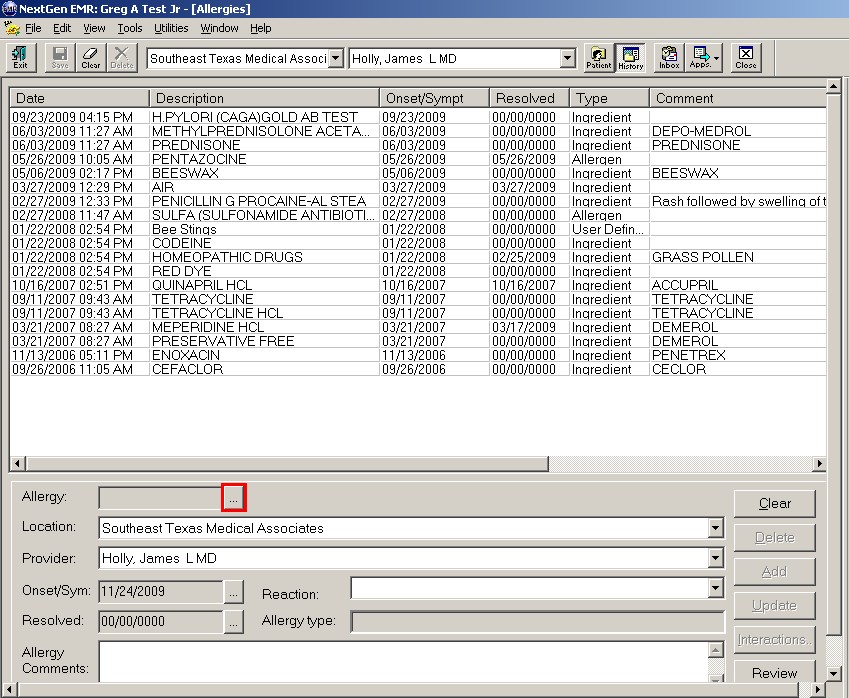
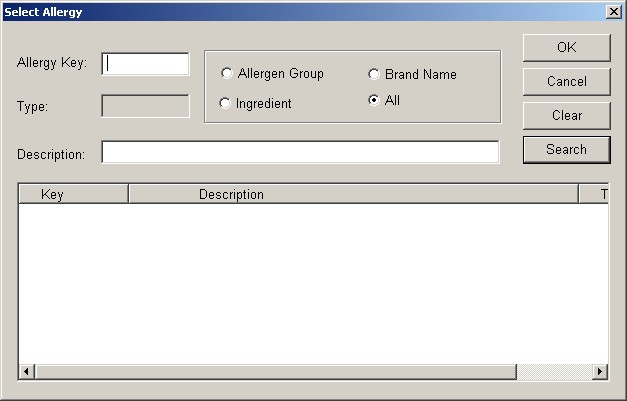
- In the space entitled Description, type in the first few letters of the medication to which the patient is allergic.
- Click on search
- Double click on the medication to which the patient is allergic
- Click on Add
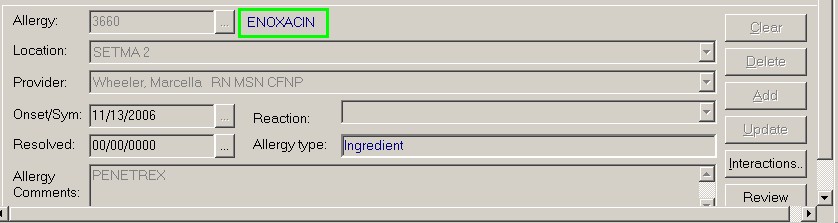
- You have added an allergy to the patient’s allergy profile
Medications -  - Bottom Left - this is how a medication is added to the patient’s medication list. This list should be kept up to date and accurate. All SIG Code Descriptions should be in English, i.e., "one tablet by mouth three times a day," rather than Latin, i.e., "one po tid." The SIG Code space in NextGen is short so while he description should be in English, the SIG Code will be in Latin. - Bottom Left - this is how a medication is added to the patient’s medication list. This list should be kept up to date and accurate. All SIG Code Descriptions should be in English, i.e., "one tablet by mouth three times a day," rather than Latin, i.e., "one po tid." The SIG Code space in NextGen is short so while he description should be in English, the SIG Code will be in Latin.
For more information on the Medication Module - Click Here
Lab -  - Bottom Right - this is how we review lab results. - Bottom Right - this is how we review lab results.
For more information on Work Flow Use - Click Here
|