|
The Master GP is the basic patient evaluation and/or history and physical examination tool in
SETMA’s suite of NextGen templates. It is accessed in several ways:
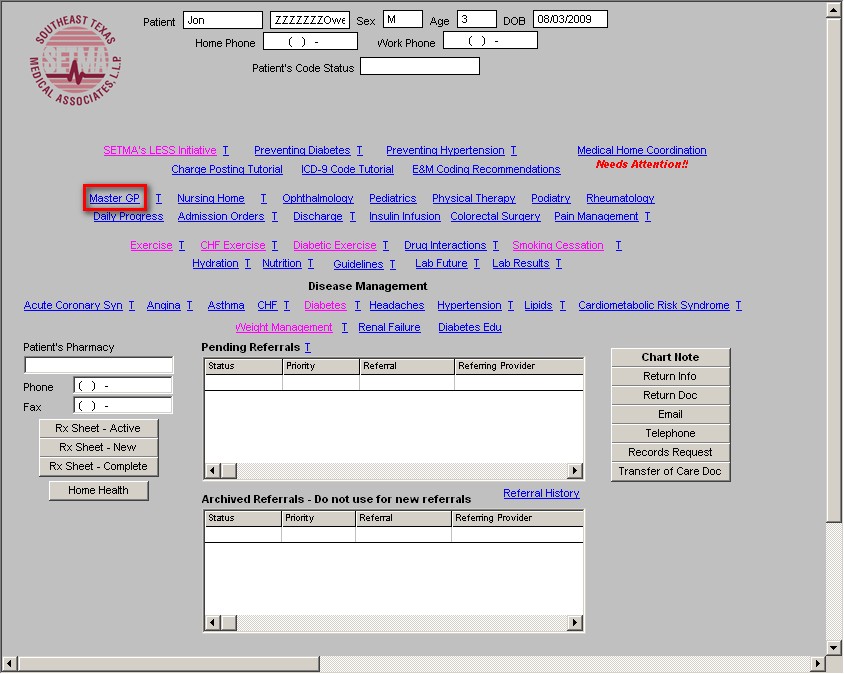
- AAA Home – in the third line by clicking on the hyperlink entitled Master GP.
- Main Tool Bar – by clicking on the Template button (top left button) at the bottom right of the screen and finding Master GP in the alphabetical list of templates. If the Master GP is not listed in your Template Preference List, you can add it.
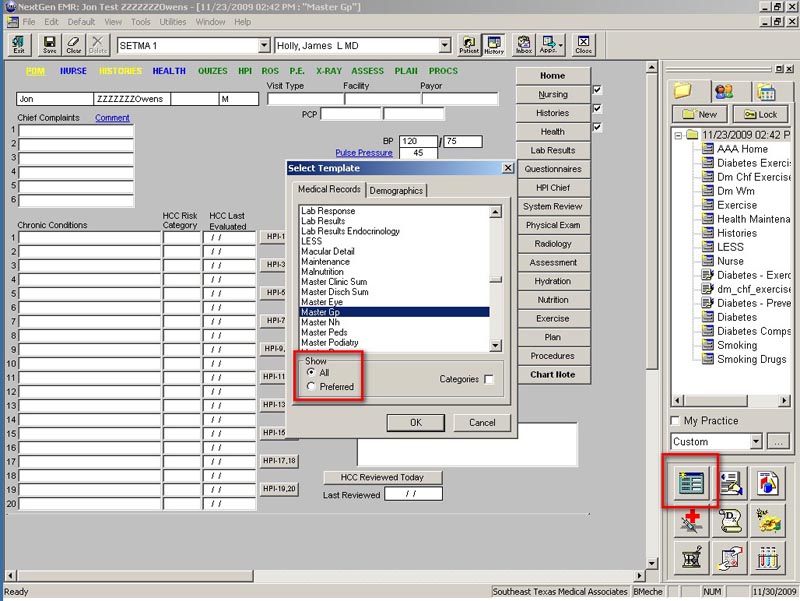
Review these documents for more information on Main Tool Bar, Setting Preferences
Once the Master GP template is opened, the Main Tool Bar should be closed.
- If you need to look at a previous visit, add a medication or allergy, review the laboratory work you will need to open the Main Tool Bar again by clicking on the Toggle Main Tool Bar button on the Top Tool Bar.
- Also, if you need to use Work Flow, you will need to open it through the Top Tool Bar.
Review these documents for more information on the Top Tool Bar ,Main Tool Bar, Toggle Main
Tool Bar and the Work Flow button on the Top Tool Bar.
Documentation on the Master GP Suite of templates is done by:
1. Clicking in boxes
2. Checking boxes
3. Activating buttons
4. Type in comment boxes
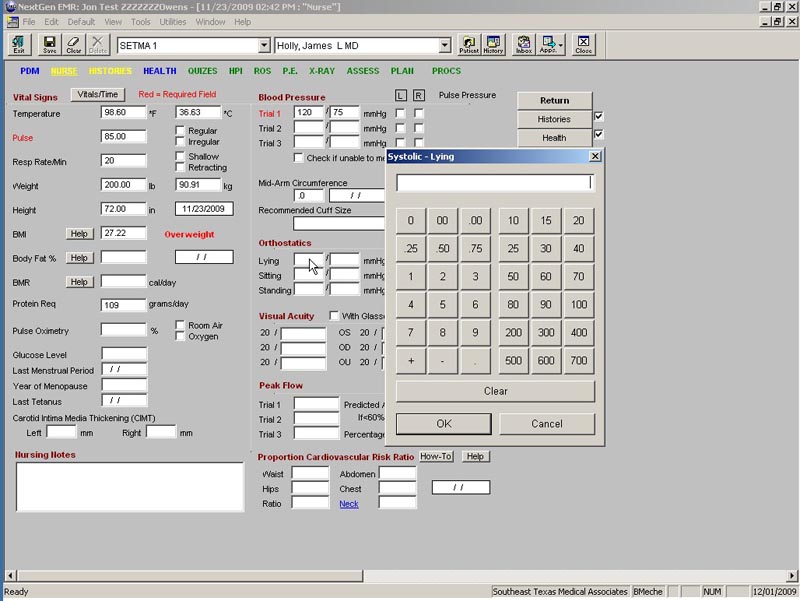
When a box appears, documentation will be by:
- Pick lists which appear when you left click on your mouse with your cursor in the box. Pick lists can be searched on by typing the first letter in the name of the element you wish to add to your encounter note.
-
Date Pads which appear when you left click on your mouse with your cursor in the box.
- Number Pads which appear when you left click on your mouse with your cursor in the box.
- Using free texts by typing in comment boxes. It is also possible to use voice recognition with NextGen, but SETMA is not present doing this.
Patient Data Master Template
Patient Data Master is the name of the first template in the GP Master Suite of templates.
At the top of the Patient Data Master and at the top of all other templates in the Master GP suite of templates, you will find:
- Title Bar

- Menu Bar

- Top Tool Bar

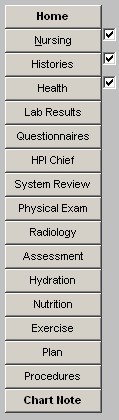
- SETMA’s Navigation Bar with twelve icons which correspond with the navigation buttons to the right of the screen.

- SETMA’s Navigation Buttons down the right hand side of the screen which corresponds with the buttons on SETMA’s Navigation Bar.
- There are seventeen SETMA Navigation Buttons.
- Until the Main Tool Bar is toggled closed the vertical right-hand navigation buttons are hidden.
- When the Main Tool Bar is closed, they appear.
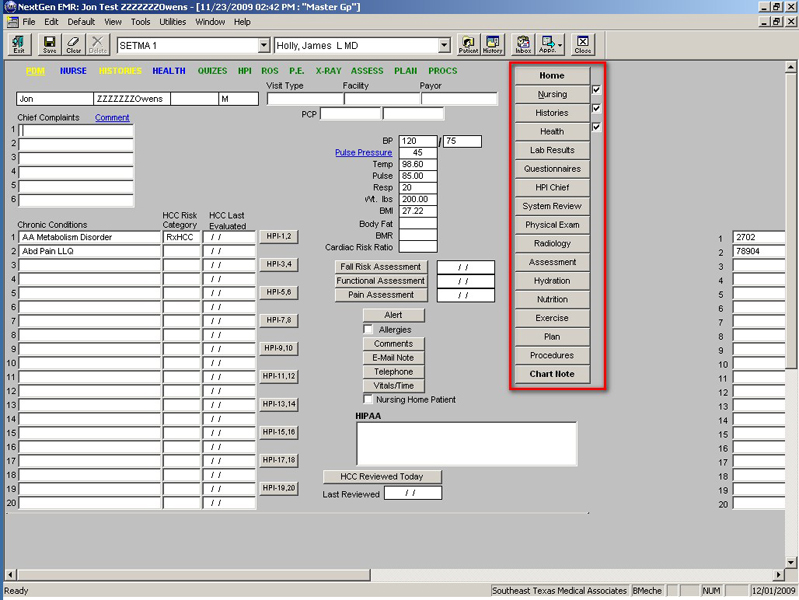
Content of the Patient Data Master
Across the top of the template, just under SETMA’s navigation bar, you will find the following information:
- The patient name, age, sex and
- The Visit type, facility where the services were delivered and the payor.
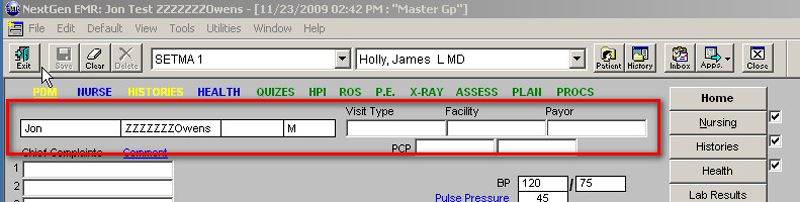
Beneath this are three columns which contain the following information: Column 1:
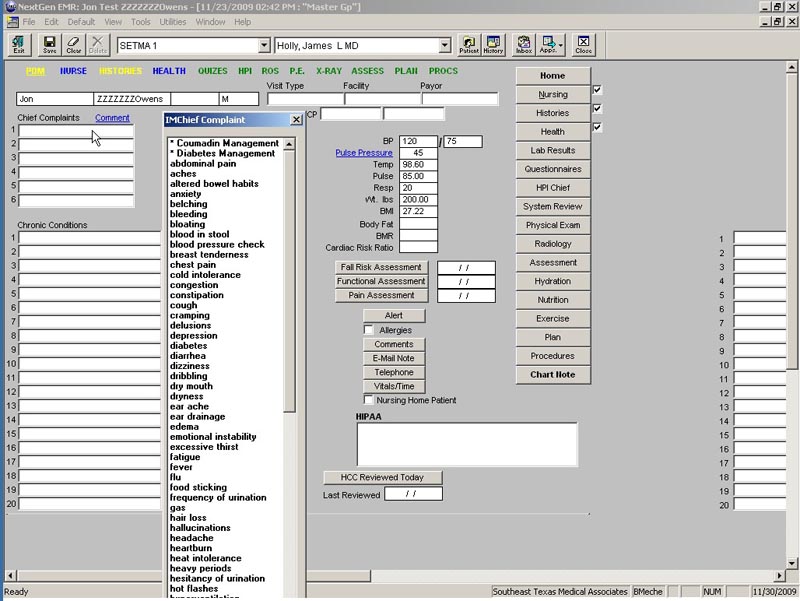
Chief Complaint
- By left clicking in the space provided, a pick list appears with common presentation complaints.
- The chief complaint should almost always be a single word or short phrase for a symptom such as, pain, shortness of breath, fainting, etc. The details about the chief complaint will be gathered under the history of present illness (HPI).
- To the right of the title “Chief Complaint” there is a “comment” box. This allows for typing in more details if appropriate.
- Where possible, the data should be collected in structured fields so that it can be analyzed and/or audited for quality and for disease management purposes.
- The chief complain fields are built in Medical Record template fields which means that the data does no copy forward to subsequent visits, i.e., the chief complaint must be entered at every visit.
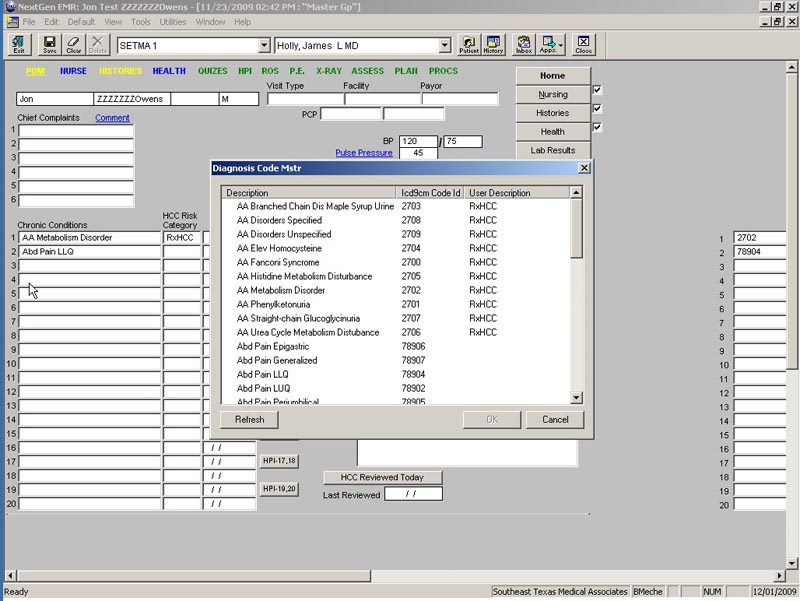
Chronic Conditions
- This essentially represents what was classically the patient’s problem list.
- These conditions are added by left clicking in the space and picking the diagnoses from the
ICD-9 code list which appears.
- The ICD-9 code list can be searched in several ways.
- This list needs to be updated regularly.
- Remember, if you type in diagnoses, they will not work with Charge Posting
- Remember, if a chronic condition displays both the ICD-9 Code description and number, it must be changed so that it will work with charge posting.
- Beside each Chronic condition box there is a HPI (History of Present Illness) button which allows you to update the status of a patient’s chronic conditions.
- In order to bill Medicare, the patient must have a legitimate Chief Complaint.
- If they do not have a chief complaint, i.e., they are coming for a “follow-up” or “check-up,”
ect., reviewing 3-4 chronic conditions and their status will qualify you for at least a 99213
E&M code even without a chief complaint.
For more information, see Finding ICD-9 Codes, E & M Codes, Charge Posting, Chronic Conditions

Column 2:
There is a display of the vital signs, which pulls over automatically from the nursing template.
Note: If the BMR is not displayed on the Patient Data Master, you need to go to the Nursing template (which is the second button on SETMA’s navigation bar to the right of the screen).
- In the space for BMR (which is midway down the first column on the left hand side of the Nursing template), left click on your mouse.
- This will display a pop-up which allows you to select an activity level for the patient, which automatically calculates the patient’s BMR.
- Then click OK.
- The BMR will now be displayed on the Patient Data Master and the chart note.
Beneath the vitals signs are seven functions which are either in a button or a check box; they are:
Alert – this interacts with the alert template which has 25 different special circumstances in relationship to the patient. Included is the fact that the patient has been fired from the practice or is
deaf or is blind, etc. If there is a large red X by the Alert box, you can click on the button to find out what the alert means.
Allergies – this is a check box which notes that the patient’s medication allergies have been entered here. When checked, a pop-up is launched which allows for the noting of the patient’s medication allergies. Remember, this does not interact with the Medication Module and the patient’s allergies must also be entered in the Allergy Module on the Main Tool Bar.
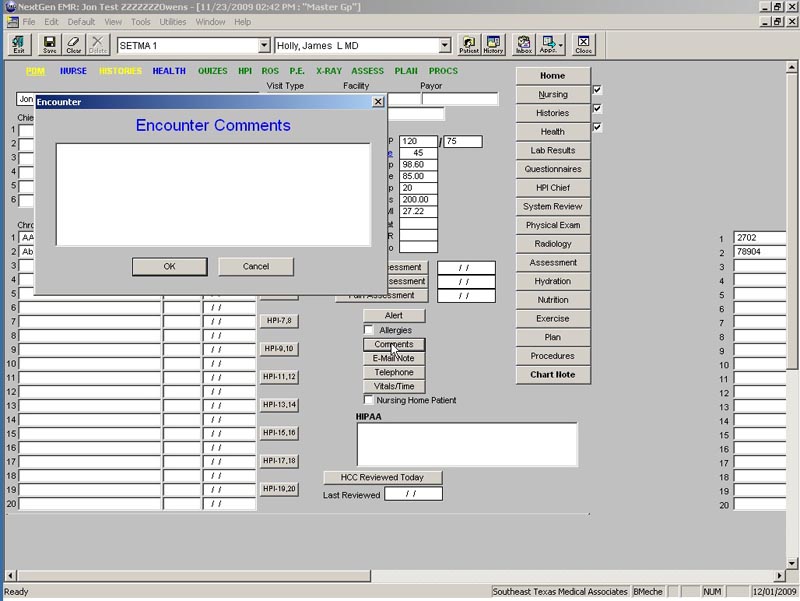
Comments – this is a box where you can type in comments about this visit. There are many
comment boxes through the Master GP Suite, this one particularly relates to general comments about the patient encounter such as: “Patient accompanied by parents, or daughter, or son, etc.
E-Mail Note – this allows you to send an e-mail anyone about this patient concerning follow-up, referrals or others management issues. When you access this function, a pop-up appears requesting directions for attachments. Typically, you would click “this template,” which will then allow the recipient to go to Work Flow and open this patient’s chart easily.
Telephone – this launches the telephone template for documenting a telephone message from or to this patient.
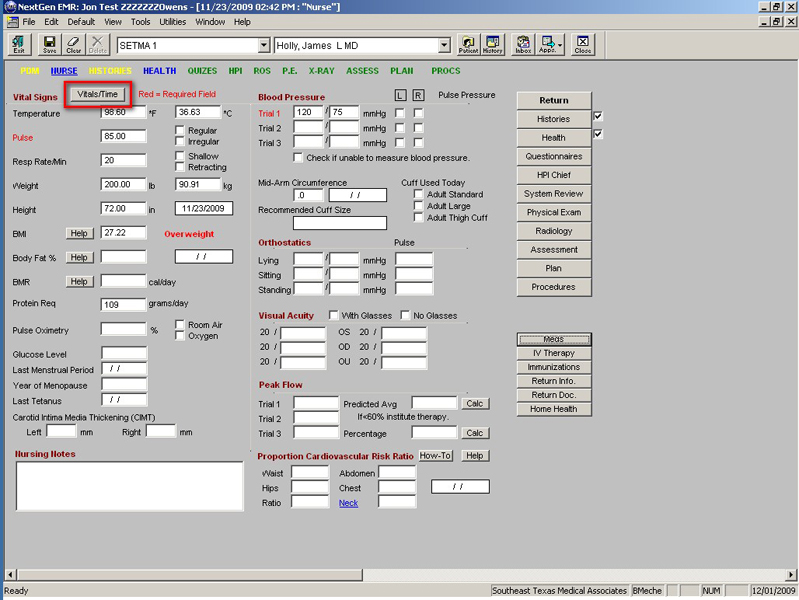
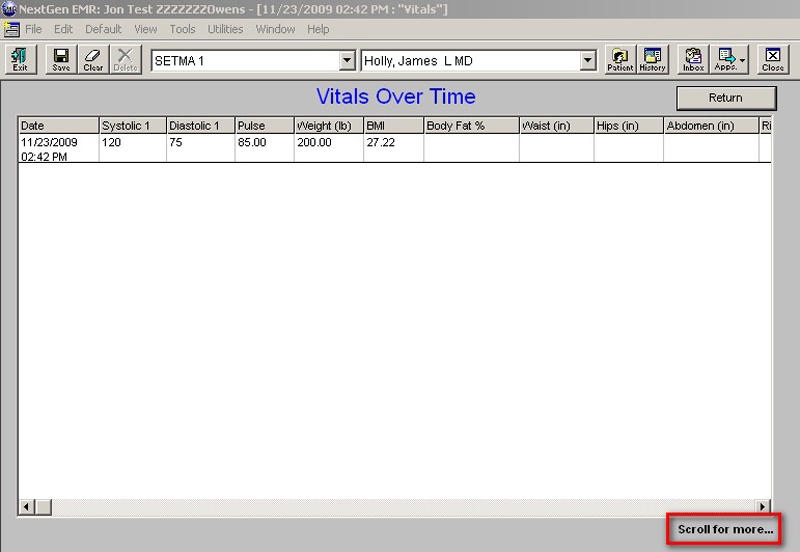
Vitals/time– this launches a display of the patient’s vitals signs from all visits in NextGen. This is a useful tool to look for patterns or trends.
Nursing Home Patient – this is a check box where a patient can be designated as a nursing home patient.
Beneath these six buttons, across the bottom of the template, are hyperlinks to:
- Nursing Home
- Pediatrics
- Physical Therapy
- Admission Orders
Column 3:
This is SETMA’s Navigation Bar and represents seventeen buttons which launch:
- Home – this takes you back to AAA Home which is the starting point for all navigation.
- Nursing
- Histories
- Health
- Lab Results
- Questionnaires
- HPI
- Systems Review
- Physical Exam
- Radiology
- Assessment
- Hydration
- Nutrition
- Exercise
- Plan
- Procedure
- Chart Note
Nursing TemplateNursing Template
When the Nursing Template launches, a pop-up appears which states: At Every Visit, Ask Every Patient, About Tobacco Use and Document Their Answer. While this is a part of the LESS Initiative, this older function has been left here because of the important of confronting every patient with the issue of tobacco use.
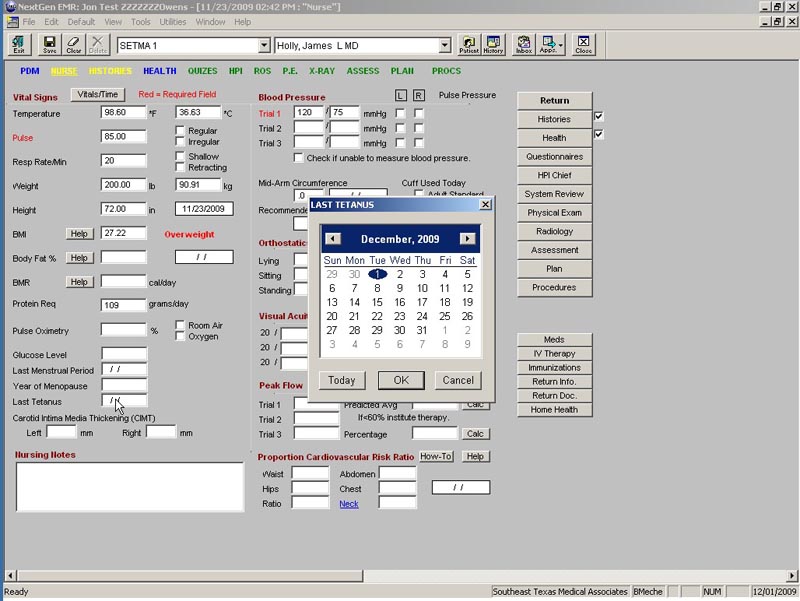
All of the patient’s vital signs are displayed here. The key points are:
- The following vital signs are required: blood pressure and pulse. These are needed to complete other functions in our preventive health initiatives and therefore are required fields which mean that before you can proceed they must be completed.
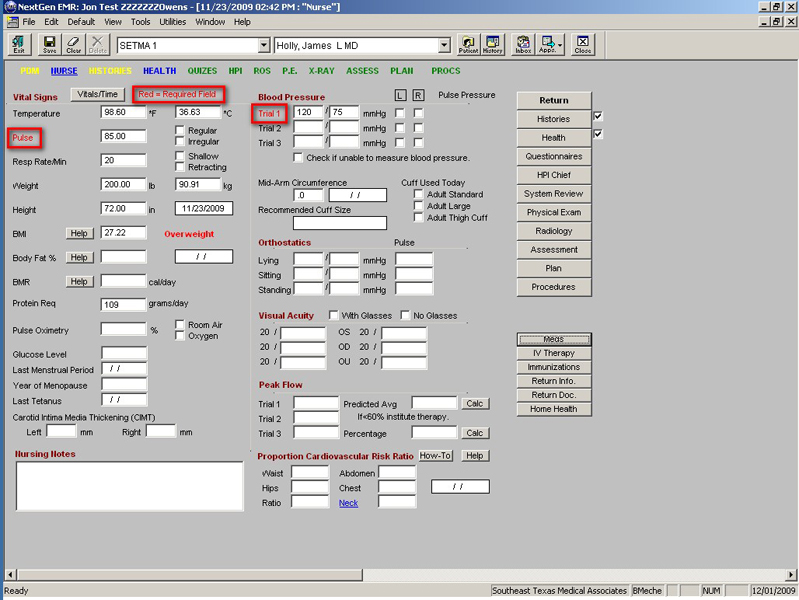
- The following are in demographic fields which means that the information in these fields copies forward to he next visit:
- Height
- Body Fat Percent
- Waist -- there is a help button which gives instructions for how to properly measure the patient’s waist size.
- Hips
- Abdomen f. Chest
- Neck – a neck circumference of greater than 16 for a woman and 17 for a man places the patient at increased risk for sleep apnea.
- The following automatically calculate:
- BMI – this automatically calculates when the weight and height are added to the patient encounter.
- BMR – you must click in the BMR box with the left mouse and assign an activity level. The BMR then auto calculates
- Protein Requirement – this lets you know how many grams of protein this patient should have each day. Even if the patient is trying to lose weight which will require a caloric-restricted diet, they should still get this many grams of protein.
- Ratio for cardiovascular risk – this is automatically calculated and is a function of the relationship between the waist and hips.
Note: The help button entitled Proportion Cardiovascular Risk Ratio states in part: Ideally, women should have a waist-to-hip ratio of 0.8 or less and ideally, men should have a waist- to-hip ratio of 0.95 or less.
- The following help buttons given details about each subject and appear on the Nursing Template:
- BMI
- Body Fat c. BMR
- Cardiovascular Risk
- At the top of the template there is the ability to look at Vital Signs Over Time which is the same as the function on the Patient Data Master.
- When the peak flow meter is used, there are two buttons with “calc” which stands for “calculate.” When clicked these will automatically calculate the “Predicted Average” and the “Percent” for this patient.
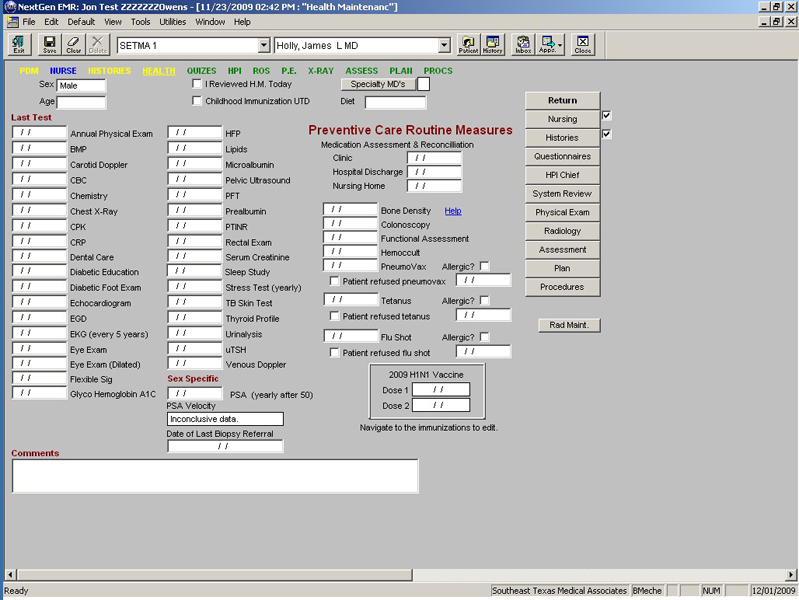
Health (Health Maintenance) Template
This is a summary of the Preventive Health and Interval Health care received by the patient. At the top of this template, after the Title Bar, the Menu Bar, the Top Tool Bar and SETMA’s Tool Bar, there is the following information:
- Sex
- Age
- I Reviewed H.M. Today – this is a check box which allows you to document that you reviewed this template during the current encounter. If this box is checked, he Health Maintenance data will print on your chart note.
- Childhood Immunization UTD (Up to Date) – a check box for documenting a summary statement about immunizations.
- Specialty MDs – this is a button which launches a pop-up where it is possible to document the names and specialties of other physicians who treat this patient.
- Diet
- Dental Care – an important issue in general health and particularly in diabetic care is dental hygiene. This documents when the patient last saw a dentist.
There are 36 parameters which are routinely tracked for both male and female and there are sex specific measures. These parameters are automatically captured when the data is generated through NextGen, but can and should be manually inputted if the care was received elsewhere.
The Comment Box at the bottom of the screen is a demographic field which means that any data which is placed there will copy forward to future visits.
At the right, there is a list of SETMA’s Navigation Buttons
Note: Just beneath, SETMA’s Navigation Button, there is button entitled Rad Maint. When accessed this launches a summary of the most recent x-rays on this patient in 21 categories. This function is also launched from the Radiology Template.
History Template
This template documents many elements of the patient’s past medical and surgical history. Its content and organization include three columns with additional material across the bottom of the template:
Column 1:
A check box to indicate that you have reviewed the patient’s past history during the current encounter. When this box is checked the information on this template will copy to the chart note.
Source – this documents who gave the information contained on the history template. It is possible to indicate that more than one person gave the information.
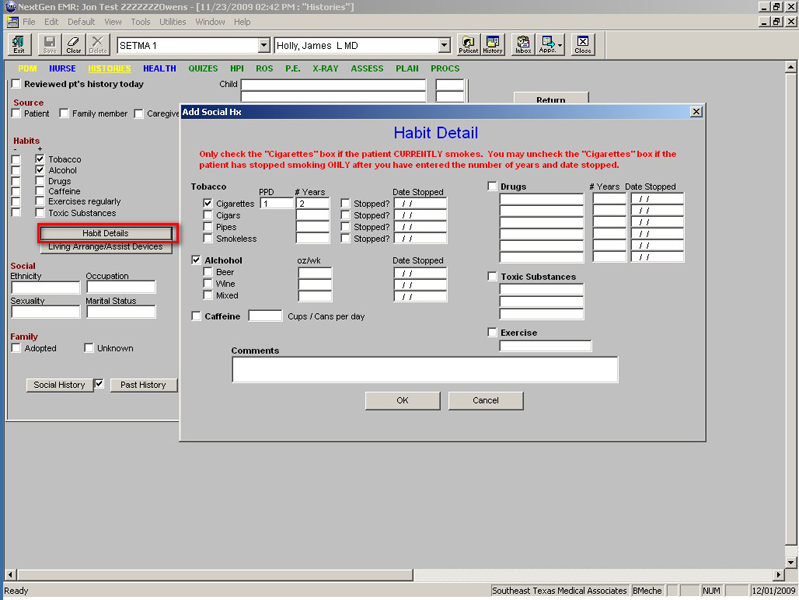
Current habits – gives the ability to document the use of or the exposure to:
- Tobacco
- Alcohol
- Drugs
- Caffeine
- Exercises Regularly
- Toxic Substances
To the right of these six functions is a button entitled Previous Habits. This allows for the documentation of the prior use of tobacco, alcohol, drugs, and the exposure to toxic substances and exercise.
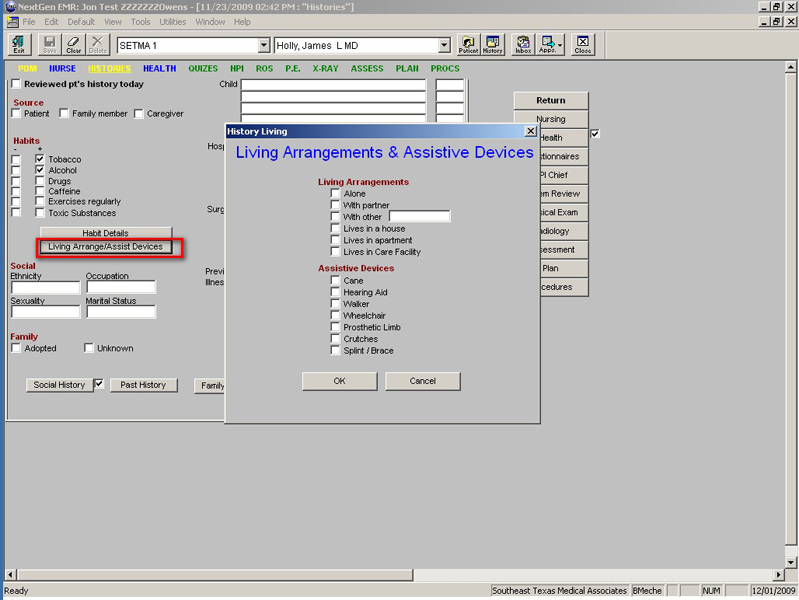
Also to the right of these six functions is a button entitled Living Arrangements and Assistive Devices which launches a pop-up where it is possible to give details about with whom the patient lives and in what kind of dwelling and also any special devices (wheelchair, walker, braces, splints they use and/or whether they have a hearing, etc.:
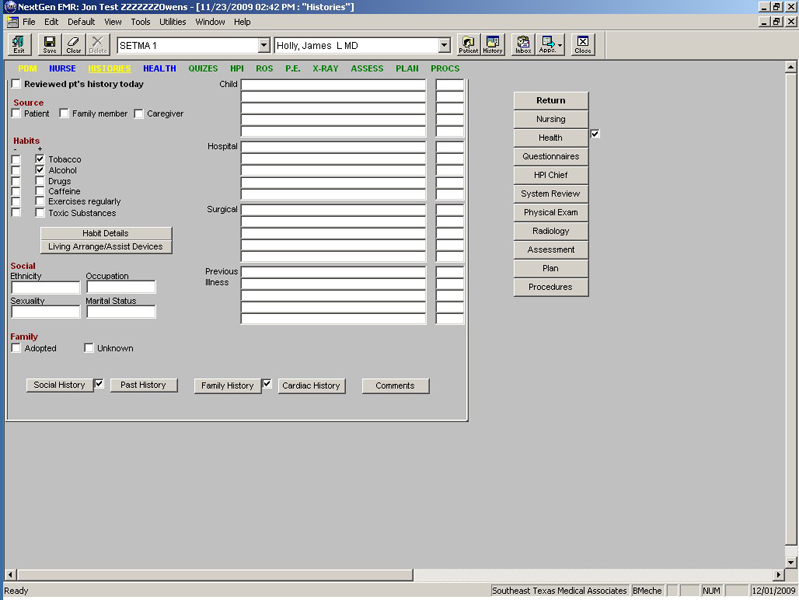
Social – this is the place to document the patient’s
- Ethnicity
- Occupation
- Sexuality
- Marital Status
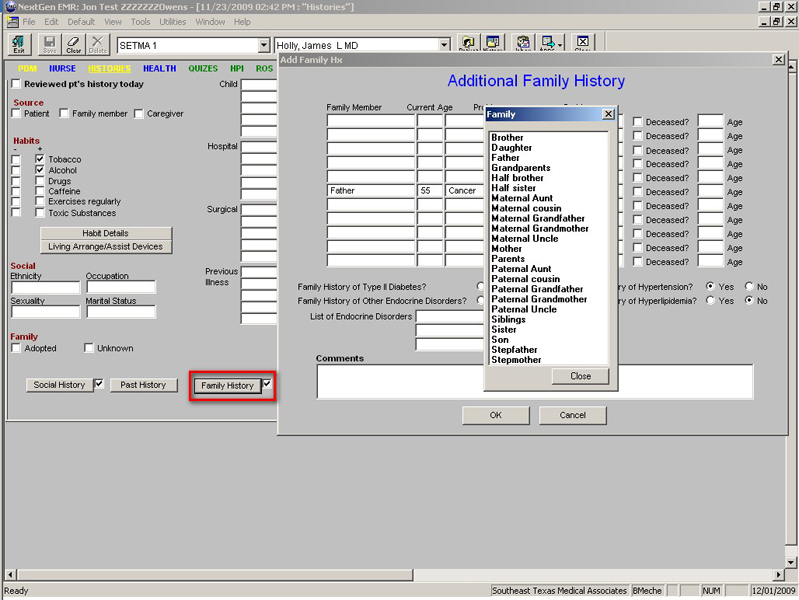
Family History with two check boxes to document the limitations on collecting a family history of:
- Adopted
- Unknown
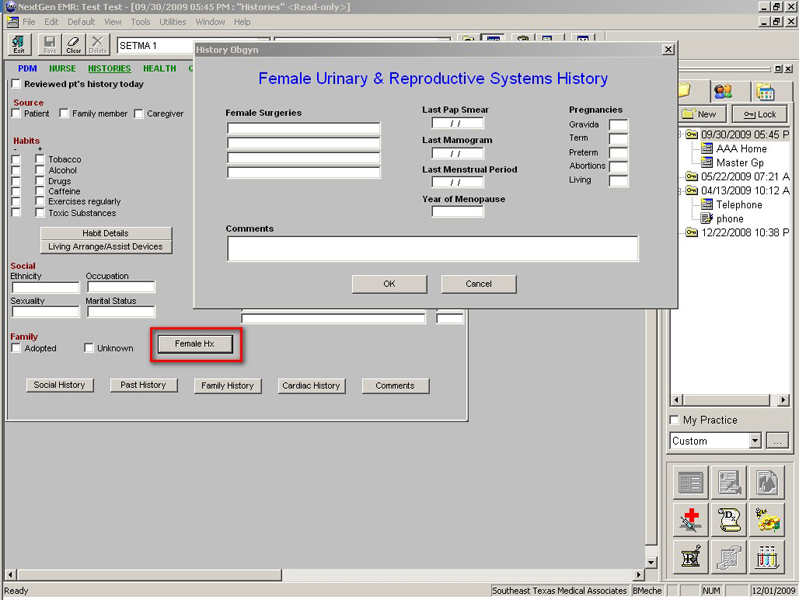
If the patient is a female you will see just to the right of the above family history section, a button entitled Female History. This allows for documentation of:
- Females Surgeries
- Last Pap Smear – which is interactive with the Health Maintenance Template
- Last Mammogram – which is interactive with the Health Maintenance Template
- LMP (Last Menstraual Period)
- Pregnancies (Gravida, Term, Preterm, Abortions, Living)
- Comments Box
Six boxes for the collection of family history including
- Relationship
- Current Age
- Problem
- State of Health
- Deceased
- Age at death
Extension of family history with five buttons for:
- Extended Social History
- Extended Surgical History
- Extended Family History
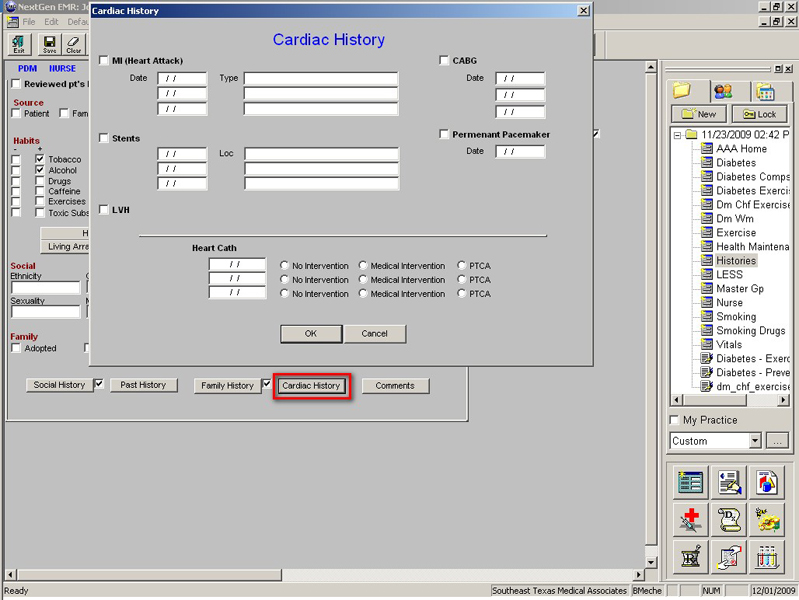
- Cardiac History – when completed the information contained here interacts with other functions in the EMR including Framingham Risk and others.
- Comments – this allows for free text to be typed in for additional details which do not fit with the boxes above.
Column 2:
Boxes for documentation of:
- Child
- Hospital
- Surgical
- Previous Illnesses
Column 3 – SETMA’s Navigation Bar
- Return
- Nursing
- Health
- Questionnaires
- HPI
- System Review
- Physical Exam
- Radiology
- Assessment
- Plan
- Procedures
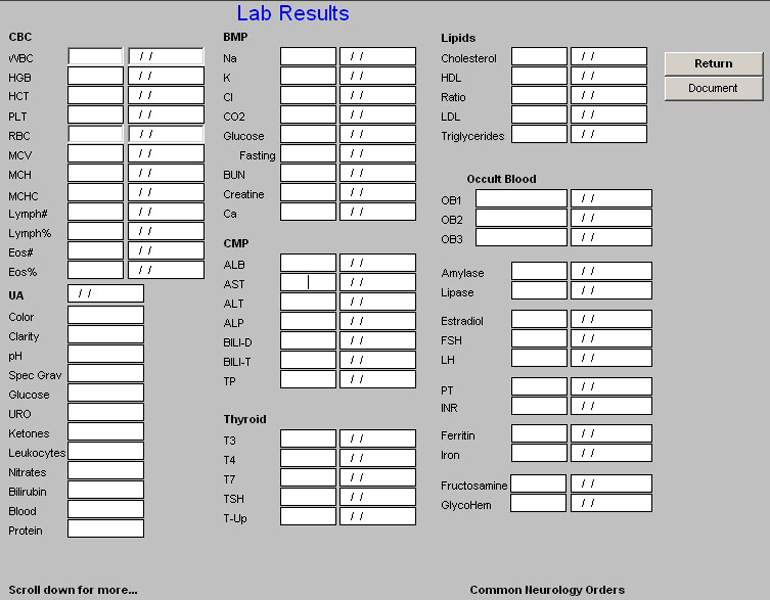
Lab Results Template
- When this template is opened, automatically the current and/or most recent lab work will be imported into this template.
- Once the process is completed, it is possible to complete a document which can be printed and given to the patient.
- Also, once the process is completed and without producing the document, this information will now print on your chart note for this current encounter.
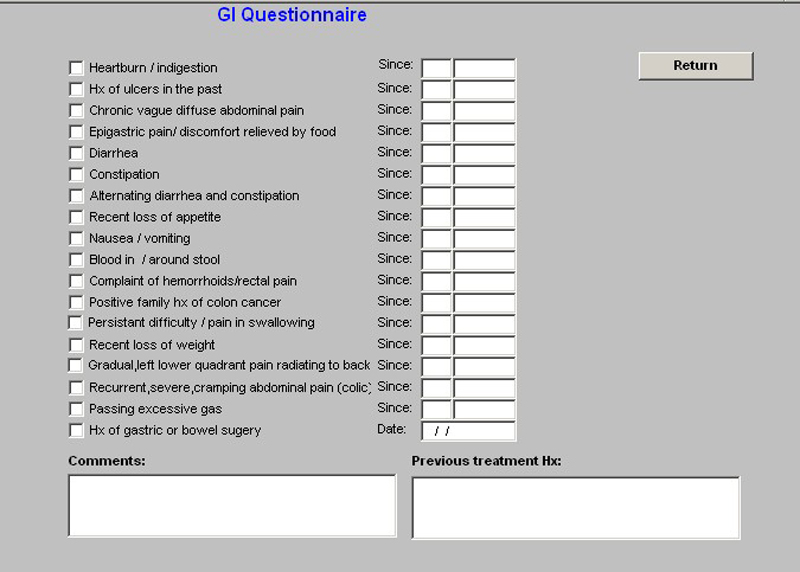
Questionnaires Template
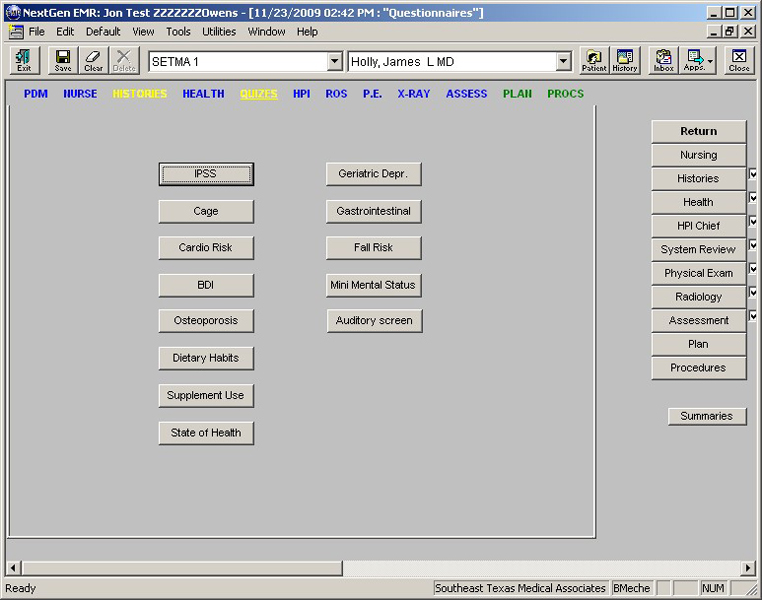
This template has 13 hpi which can be accessed and completed; they are:
- AUA -- American Urological Symptom Index – A score, a scale and a result are given. It is also possible to compare prior results with today’s result.
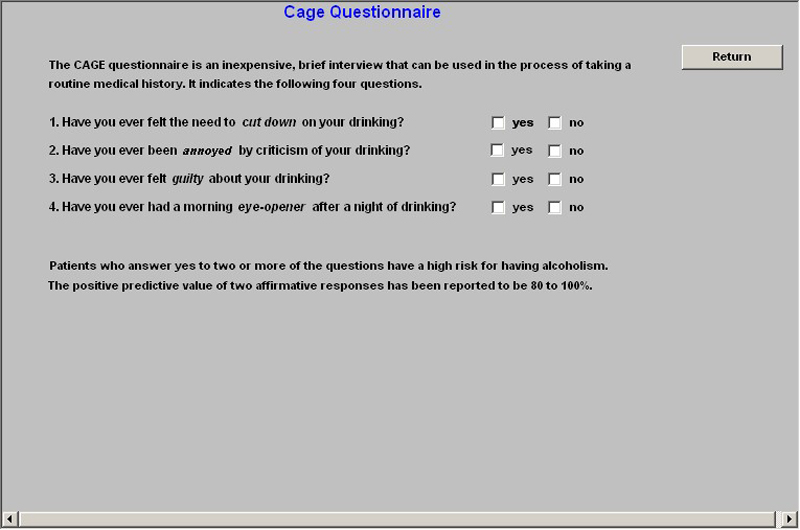
- CAGE Questionnaire for Alcoholism – A score and a scale are given.
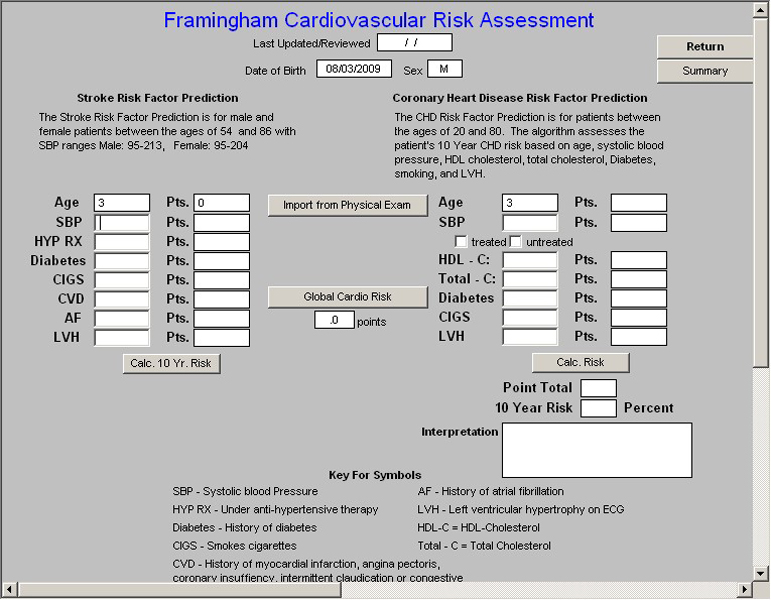
- Framingham Cardiovascular Risk – this also triggers from many other places as well.
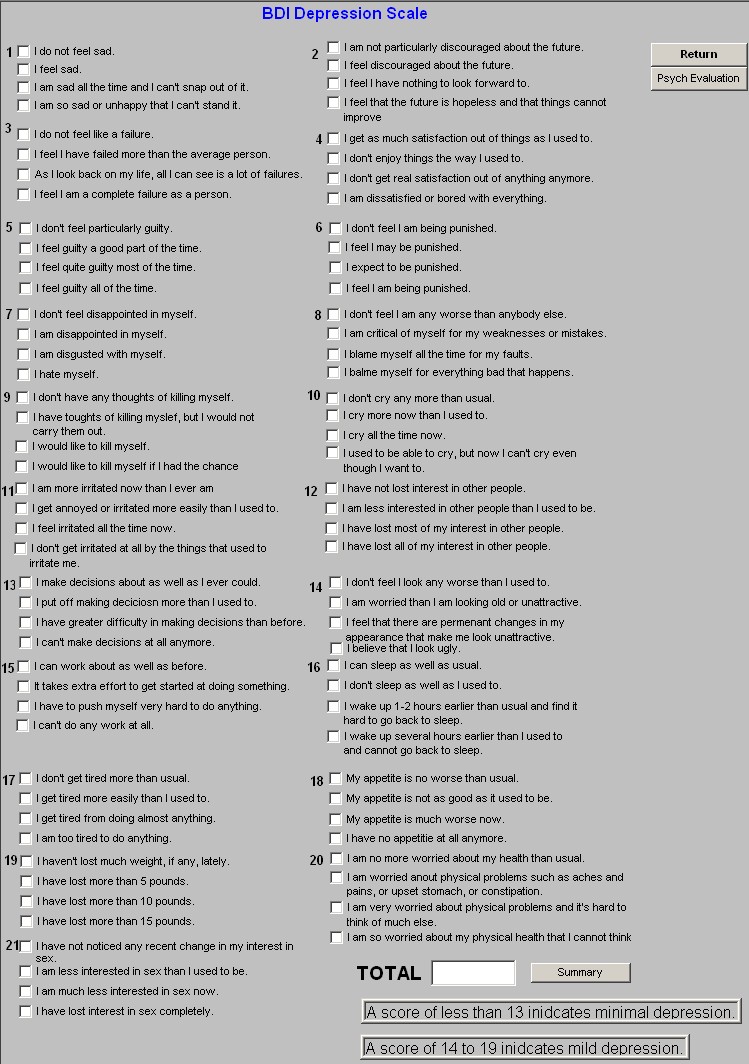
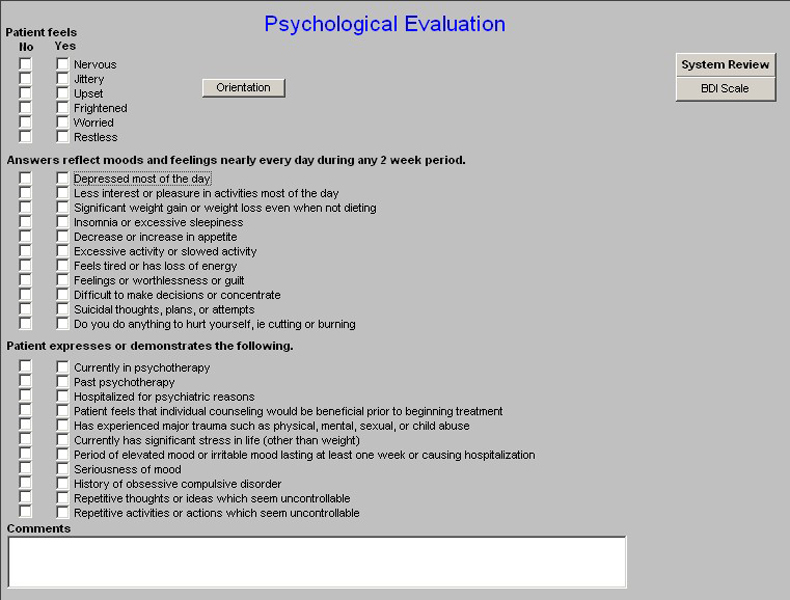
- BDI Depression Scale – A score, a scale and a summary with past results are given. A link with the Psych Examination is also present.
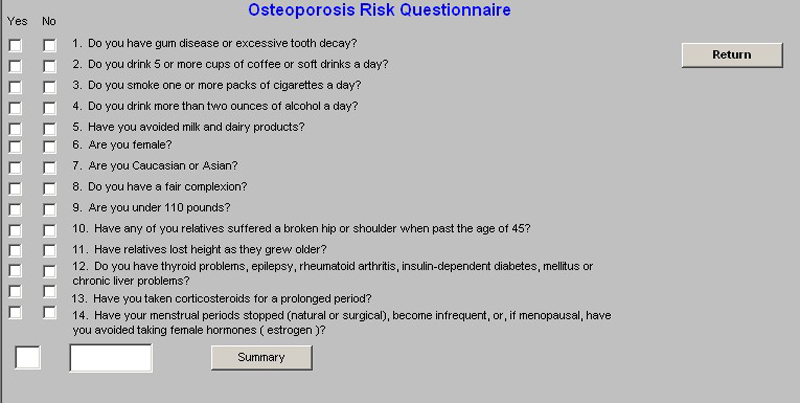
- Osteoporosis Risk Questionnaire – A score, a scale and a summary are given.
- Dietary Habits -- What Are Your Current Eating Habits – this evaluates patients on whether their eating habits contribute to inflammation in the body. A score and a result are given.

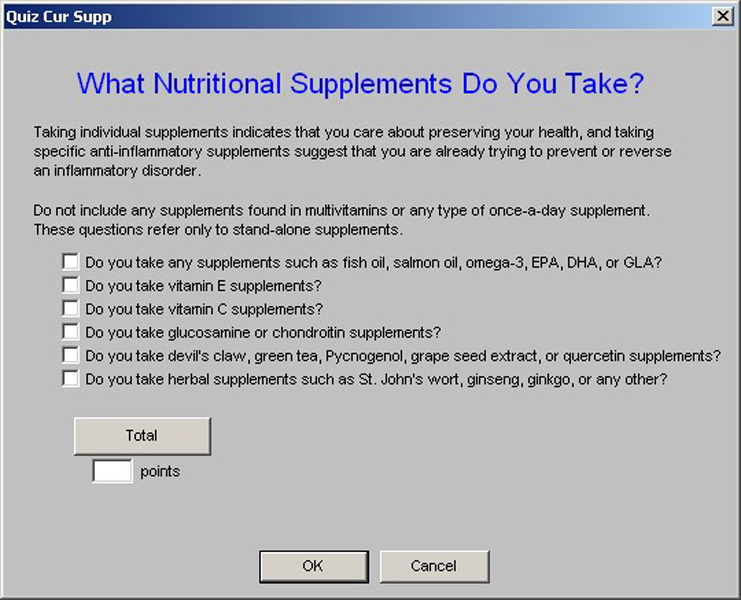
- Supplement Use -- What Nutritional Supplements Do You Take? – Intends to uncover evidence of treatment of inflammation in the body. A score and a result are given.
- State of Health – What is your current Health? – A questionnaire which guides you to determine whether or not you have active inflammation in your body. A score and a result are given.

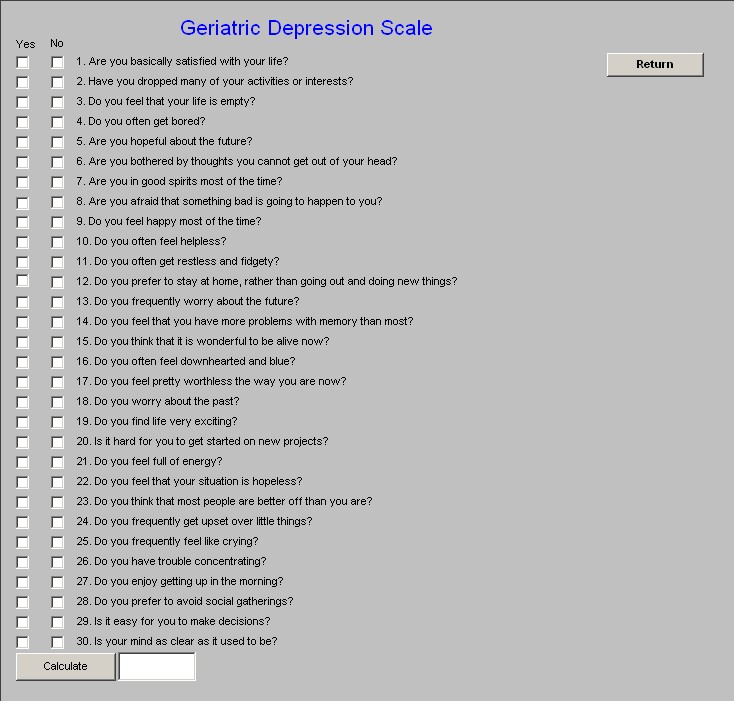
- Geriatric Depression Scale – a score and result are given.
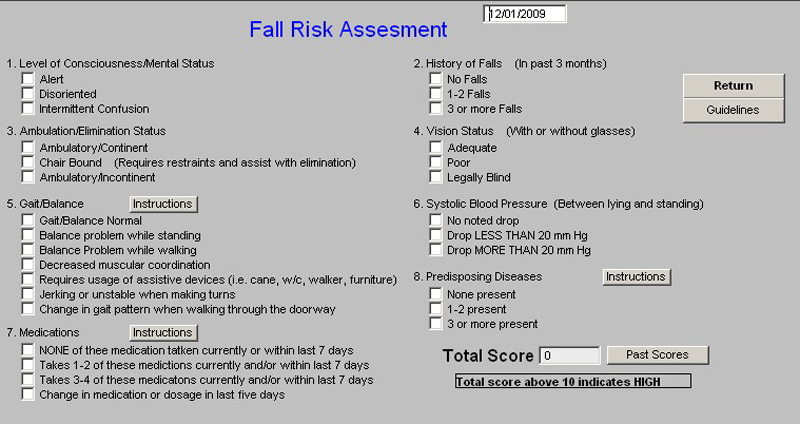
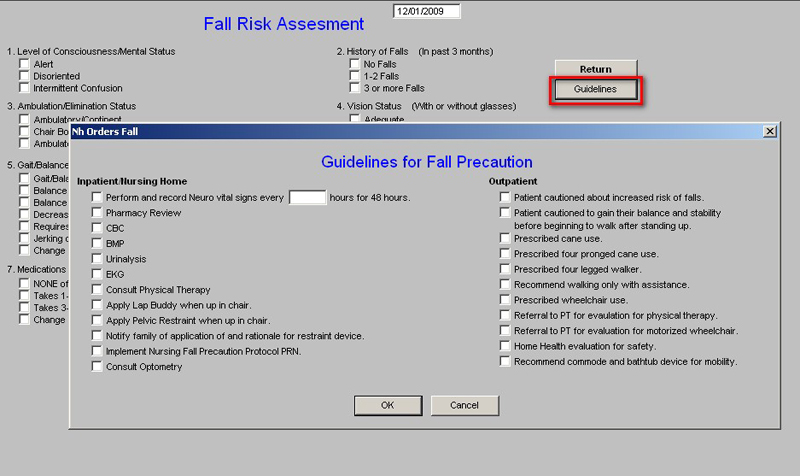
- Fall Risk Assessment – A Score and result are given.
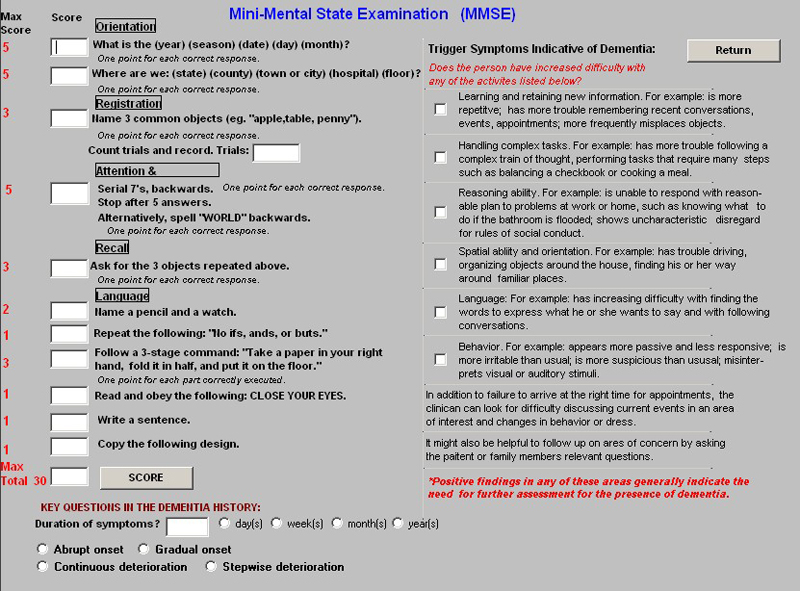
- Mini Mental Status Examination – A score a scale and a result are given.
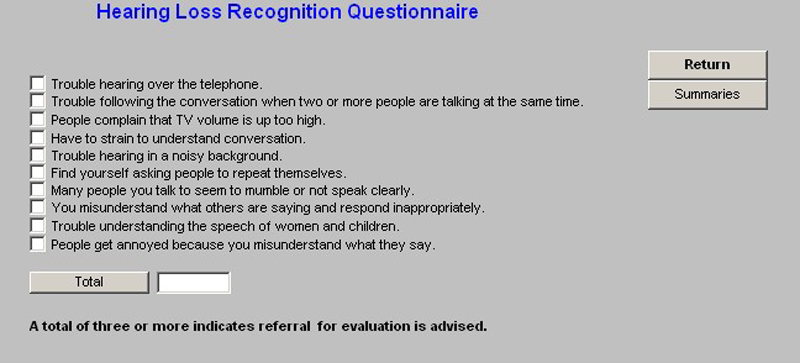
- Auditory Screen – Hearing Loss Recognition Questionnaire – A score and scale are given.
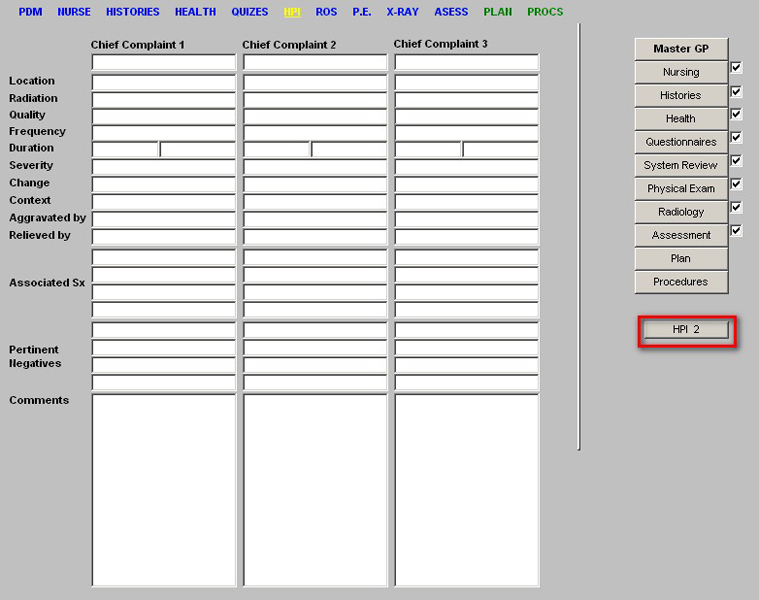
HPI Chief Template
This template allows for the documentation of details of the patients History of Present Illness. This is organized in relationship to the patient’s chief complaint or chief complaints. The elements of the HPI are:
- Location
- Radiation
- Quality
- Frequency
- Duration
- Quality
- Aggravated by
- Relieved by
- Associated Symptoms
- Pertinent Negatives
- Comments – a place to add free text if an important details does not allow for documentation in one of the fields above.
Note: For a Chief Complaint and/or a History of Present Illness to contribute to your Evaluation and Management Code, you must have four or more elements of the HPI completed for each Chief Complaint.
On the template are display spaces for three Chief Complaints which automatically copy from the
Patient Data Master.
To the lower right on the HPI Template is a button entitled HPI 2, which allows for documentation of the History of Present Illness for three additional Chief Complaints, allowing for the documentation of six chief complaints at each encounter.
SETMA’s Navigation Buttons are presented to the right of the template represent the means of moving back and forth, in and out, of one template to another.
Systems Review (ROS)Template
The content of the ROS Template is in four columns.
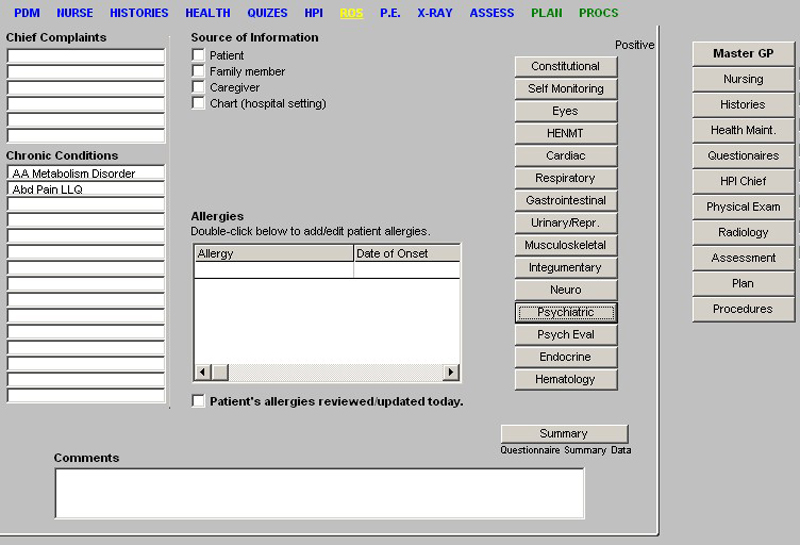
Column 1:
This brings into the ROS Template the Chief Complaints and the Chronic Conditions from the
Patient Data Master
Column 2:
From the History Template, this brings the source of the material being documented. That source can be multiple, i.e., the patient and a family member and/or care giver.
Summary Button – this presents a summary of the results of any and all Questionnaires which have been completed on this patient.
Column 3:
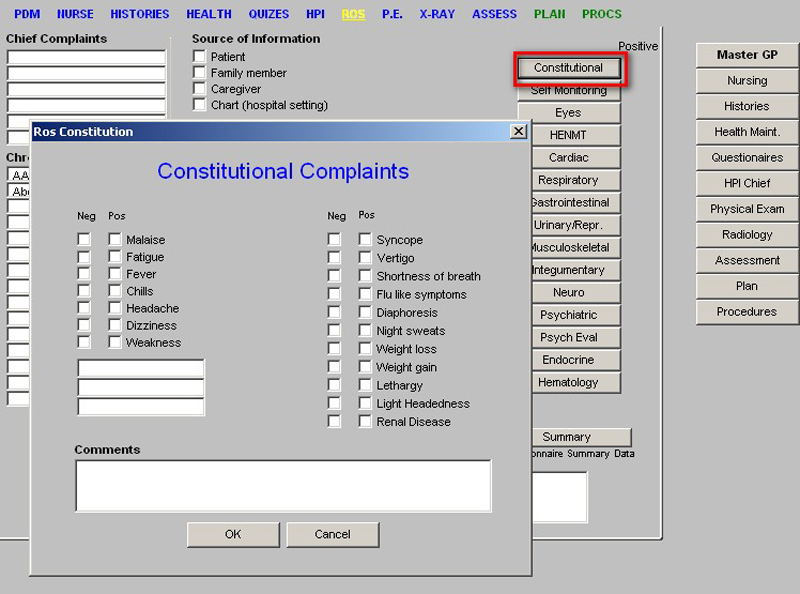
There are fourteen buttons with the names of 14 different body systems which can be reviewed. Documentation is with check boxes, number pads and calendar pads.
Note: The Constitution ROS should be completely filled out on EVERY patient seem in the clinic, ER, Hospital, Nursing Home or elsewhere.
Column 4:
SETMA’s Navigation Buttons which carry you through the Master GP Suite of Templates.
Physical Examination Template
This template is also organized in four columns.

Column 1:
This brings into the Physical Examination Template the Chief Complaints and the Chronic
Conditions from the Patient Data Master
Column 2:
Vital Signs Button:
This carries you back to the Nursing Template for review of the patient’s Vital Signs.
Note: To have the Vital Signs appear on the chart note, you must access this button even if you have already reviewed the patient’s vital signs on the Patient Data Master and/or the Nursing Template. This brings from the History Template, the source of the material being documented. That source
can be multiple, i.e., the patient and a family member and/or care giver.
Column 3:
A series of 18 buttons on which a thorough physical examination can be documented.
- Constitution – this should be completed on every patient at every visit or encounter. The BMI is documented here and automatically chooses the level of obesity if any.
- Head/Face – there is a help button on this pop-up which gives the function of the cranial nerves and allows documentation of their functional status.
- Eyes – there is a tracking of a dilated eye exam (required annually on diabetics) and a routine eye examine done without dilation by the primary provider.
- Ear
- Nasopharynx
- Neck/Thyroid – there is opportunity for documenting the brachial plexus evaluation on this neck template.
- Respiratory/Thorax – on this template there is a place to document if the patient has “rales” – this interacts with the CHF quality of care standards.
- Cardiovascular – peripheral edema is also documented here.
- Breast – by clicking the check box at the top of the template, you update the health maintenance template for breast examination.
- Abdomen/GI
- Genitourinary – this is a sex specific examination, i.e., it is different for males and females.
- Rectal – there is a check box which updates the health maintenance for last rectal exam.
- Back – there is a help button which gives the normal range of motion for each joint.
- Musculoskeletal
- Neurological – there are two pop-ups on this template in addition to the data which is collected on the template: one is for Cranial Nerves (the same as the one of Head/Face) and the other for Motor function.
- Integumentary
- Psychiatric – this is a larger template and requires scrolling to see all documentation opportunities.
- Foot – this has three pop-ups which are important:
- Extremity Examination
- Monofilament neuro-exam of the foot – also gives instructions on how to do monofilament examination.
- Risk Assessment – this requires documenting the pulses, sensory status, deformity, ulcer, and amputations. When those entries are made by check boxes, activate the “calculation” button which will execute a plan of care for foot care, particularly important for the diabetic. This will print on the chart note.
Column 4:
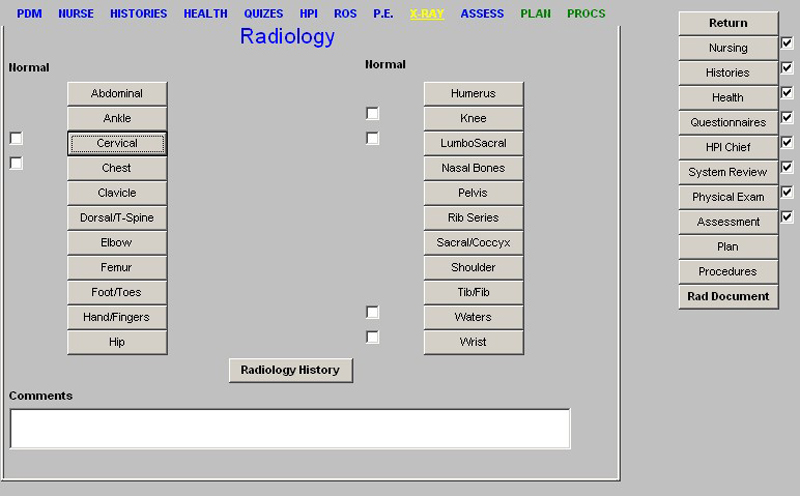
SETMA’s Navigation Buttons which carry you through the Master GP Suite of Templates. Radiology Template
- This is a list of 22 buttons each of which launches a pop-up on which the x-ray results for the designated procedure can be documented.
- The Rad Maint button, which appears just under the title Radiology, launches a pop-up which gives a summary of the most recent radiographic studies in 21 categories done in the clinic on this patient.
- Once the template for this encounters x-rays are completed, you need to click the Document
Button in order to produce a document of your x-ray report. The Document Button appears at the bottom of SETMA’s Navigation Buttons on the Radiology Template.
Assessment Template
Note: For the Assessments to print on your chart note, you must open the Assessment template using the SETMA Navigation Buttons at the right side of the screen.
This template is organized in four columns.
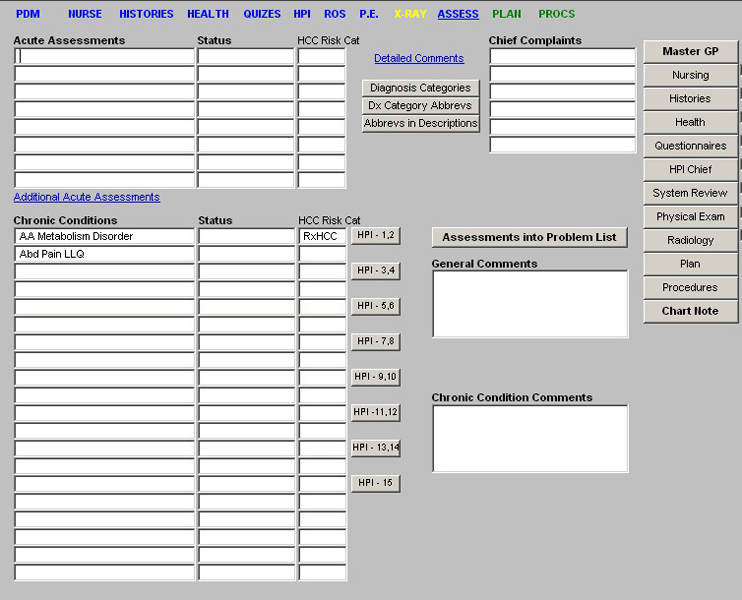
Column 1:
Assessments –
- This is the place for you to document your conclusions about the patient’s diagnoses.
- The pick list on the Assessment section of this template is SETMA’s collection of almost 8,000 ICD-9 codes.
- For directions on how to find ICD-9 Codes see the tutorial on Finding ICD-9 Codes.
- The Assessment listed here are in Medical Records Fields which means that do not copy forward.
- However, if you are completing a follow-up evaluation from a previous visit or from a discharge from the hospital, you can add the assessments from a previous visit by doing the following:
- Open the Main Tool Bar
- Look in the window where all the patient’s encounters are documented.
- Find the encounter date which has the assessment you are interested in copying.
- Expand the information in that date by clicking on the + just to the left of the encounter date.
- Find the word Assessment under that date.
- Highlight that Assessment by right clicking on your mouse
- Keeping the mouse depressed
- Drag the Assessment forward today’s visit and drop it over the date of today’s visit.
- You will be asked whether you want to copy this material today’s visit; answer, “yes.”
- Now the old assessment is on your present note.
Note: Once you open the Assessment Template on the present encounter, you cannot “click and drag” an assessment from a previous visit. You must bring the previous assessment forward before opening the current encounters assessment template.
The “click and drag” function is extremely valuable as if you are following up on seven problems, you do not have to re-enter them, you simply “click and drag” and then update the status.
Once you have completed the Assessments for today’s encounter, you need to place a status by each of the assessments. That is done by clicking on the box next to the assessment and selecting the appropriate status, i.e., acute, chronic, improved, etc.
Note: If you do not select the diagnosis from the ICD-9 Code list, your assessment will not work with charge posting, which is very important. See both Finding ICD-9 Codes and Charge Posting Tutorials.
Note: The automatic advancement of your cursor is from Assessment box to the status box to the next Assessment box. This is different from the Chronic Conditions described below as the automatic advancement of your cursor is from the Assessment Box to Assessment box and form the Status Box to the next Status Box. The logic of this will become obvious to you.
Chronic Conditions
This is similar to the old Problem lists which we tried to maintain in our paper charts. As those problem lists, so this Chronic Conditions list, it:
- Needs routine maintenance,
- Adding and eliminating problems and as they appear and/or are resolved.
Note: If the ICD-9 Code which is in the Chronic Problem List appears with its description and its number, it will not work with charge posting. All of the old ICD-9 Codes which have the description and the number, MUST be changed to he new system where only the description appears and the number only appears when you use the chart posting function. Typing in diagnoses will not work with charge posting as the there will be no ICD-9 number linked with the description you type in to the Chronic Conditions or Assessments boxes.
- To the right of the Chronic Conditions are HPI buttons which allow you to document the status and relevant activity of the Chronic conditions.
See Chronic Conditions for more information
At the bottom of the first column is a Comment Box which allows you to make any additional
Assessment comments which do not fit into the above format.
Column 2
There are three buttons entitled:
- Diagnosis Categories
- Dx Categories Abbrev
- Abbrevs in Descriptions
These are helps to finding ICD-9 Codes. For an explanation of these see Finding ICD-9 Codes.
Column 3
The Chief Complaints are brought forward from the Patient Data Master
At the bottom of this column is a General Comments Box.
Column 4
SETMA’s Navigation Buttons
Hydration Template, Nutrition Template, Exercise Template
These three buttons link with the templates by the same name. For tutorials on their use, see Hydration Assessment, Nutrition, Exercise Prescription.
Plan Template
This is one of the most important templates in our entire Suite. Understanding and using it properly is critical to your success in using SETMA’s presentation of NextGen.
The Organization and Structure
The top of the template has the same structure as all others with one very important difference. The following are the same:
- Title Bar
- Menu Bar
- Top Tool Bar
- SETMA’s Navigation Bar
Here is the difference; beneath these four bars is a new set of navigation tools which we will call
Charge Posting Bar. This bar consists of nine links which operate the Charging Posting Function.
They are:
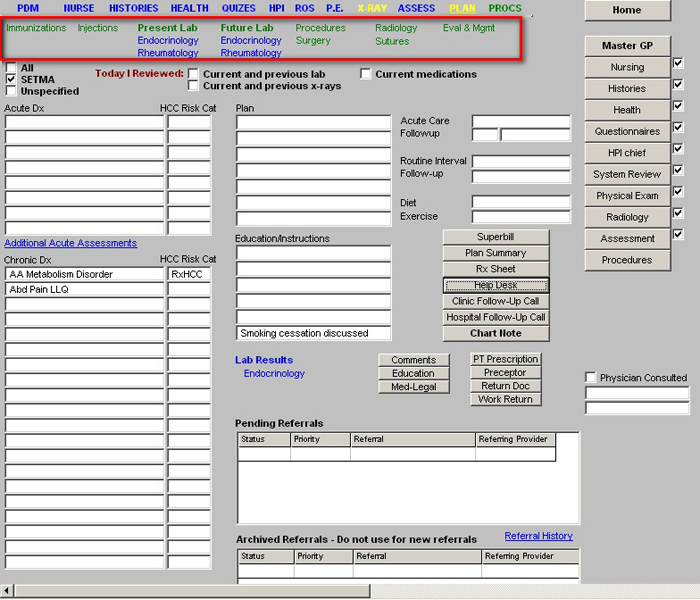
- Immunizations
- Injections labs
- Procedures
- Radiology
- Evaluation and Management
- Future Labs
- Surgery
- Suturing
These are the Charge Posting Templates. For details see Charge Posting: How To Use It. The remainder of the Plan Template is organized into four columns:
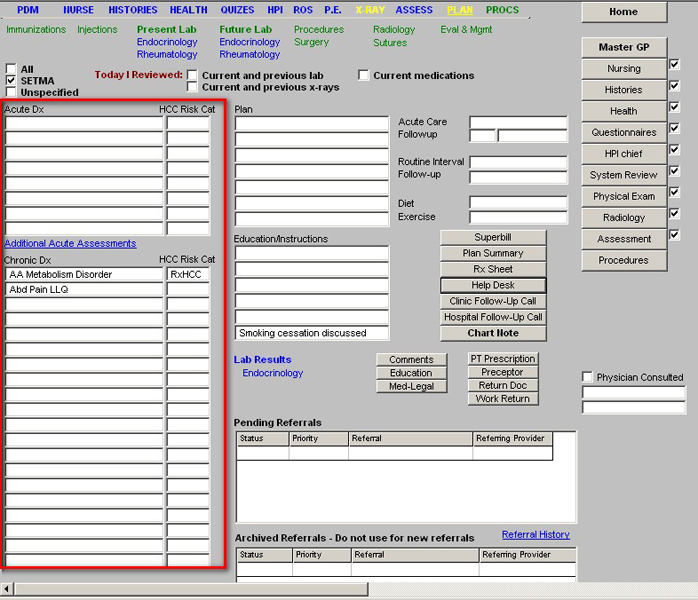
Column 1:
- Acute Dx – this is the same as the Assessments on the Assessment Template and copies forward from that template. Additional Assessments can be added from the Plan Template, however, unless the Assessment template has been opened, the Patient’s Assessments will not print on the chart note.
- Chronic Conditions – this is the same as on the Patient Data Master and the Assessments
Template.
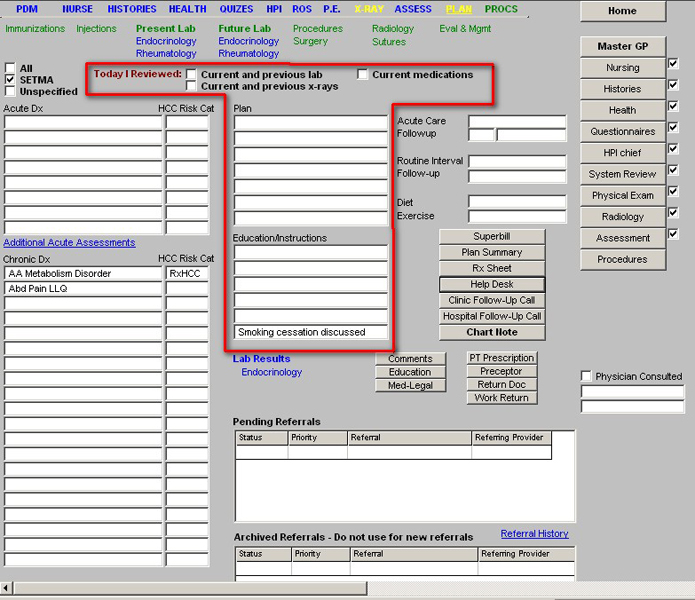
Column 2:
At the top of column 2, there are two check boxes, which state “Today I have reviewed:
- Current and previous lab
- Current and previous X-rays
Beneath that there is a designation Extended Plan of Care with a button associated. When executed this button launches a pop-up which enables a provider to document an extensive plan of care.
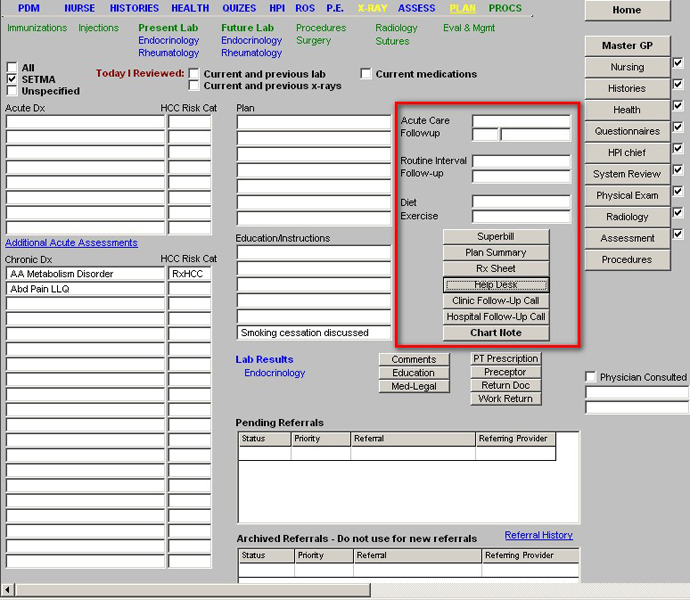
Column 3
In this column there are two functions related to follow-up care.
- First there is the acute follow-up.
- Then there is Routine Interval Follow-up.
- The concept is this.
- If you need to see the patient in six months for cholesterol follow-up, you put that follow-up in the Routine Interval Follow-up.
- If you need to see the patient back in three weeks for low back pain, you put that in acute follow-up.
This means that if the patient is seen five times between the present visit and a Routine Interval Follow-up in six months, the patient will not be lost to follow-up for the Routine visit.
Diet – this documents the patient diet and interacts with other parts of the record
Exercise – this allows documentation of the patient’s exercise habit.
Beneath these two fields are five buttons:
- Superbill – while SETMA utilizes electronic chart posting and chart capture, this function allows the provider to create a copy of the superbill to see if it was done correctly. It is not necessary to complete this function in order to make charge posting work.
- Plan Summary – this creates a document which summaries briefly the plans executed on this patient visit.
- Rx Sheet – this creates a list of the patient’s medication which should be given to them at each visit.
- Help Desk – this provides billing information which is never used.
- Chart Note – this creates the chart note.
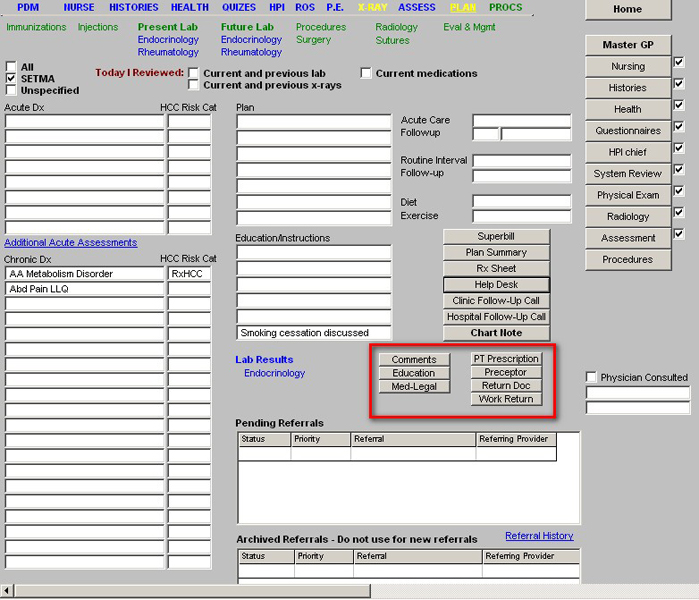
Beneath these five buttons are two columns of four buttons per column
First column:
Second Column
- PT Prescription -- this links the provider to Golden Triangle Physical Therapy’s (GTPT)
prescription which is documented in GTPT’s Physical Therapy Suite of Templates.
- Preceptor – this launches a pop-up where a preceptor for a student or other trainee can document their oversight.
- Return Doc – this creates the return to work or school document.
- Work Return – this allows for documentation of the details required for a return to work or school document.
Across the bottom is access to the Referral Templateby double clicking in the space provided. For a tutorial on how to use the Referral Template, click on this link.
Column 4
SETMA’s Navigation Buttons
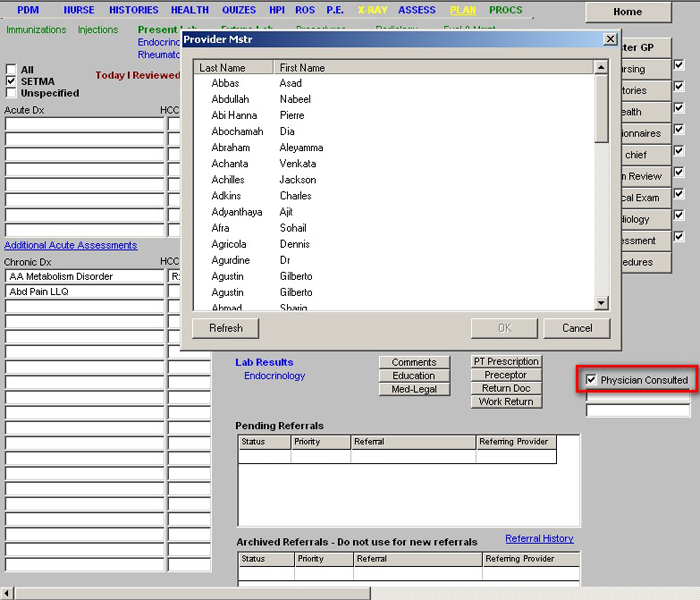
Physician Consulted
When the check box is clicked it launches a list of SETMA physicians who can be consulted by nurse practitioners or other providers. This allows for the documentation of your having discussed the care of the patient with another provider.
Procedures Template
This template has 24 buttons which launch various tools for the documentation of:
- Cerumen removal
- Cyrotherapy
- Debirdement
- Digital Block
- Electrocardiogram
- I&D
- Joint Injection
- Nail Removal
- Skin Biopsy
- Stress Report
- Suture Removal
- Wound Repair
Special Procedures:
- Bone Density
- Carotid Doppler
- CPET
- Echocardiogram
- Elec Stim Thearpy 1
- Elec Stim Therapy 2
- PFT
- Rhinolarnygoscope
- Stress Test
- Venous Doppler
- Colon Rectal Surgery
- Breast Biopsy
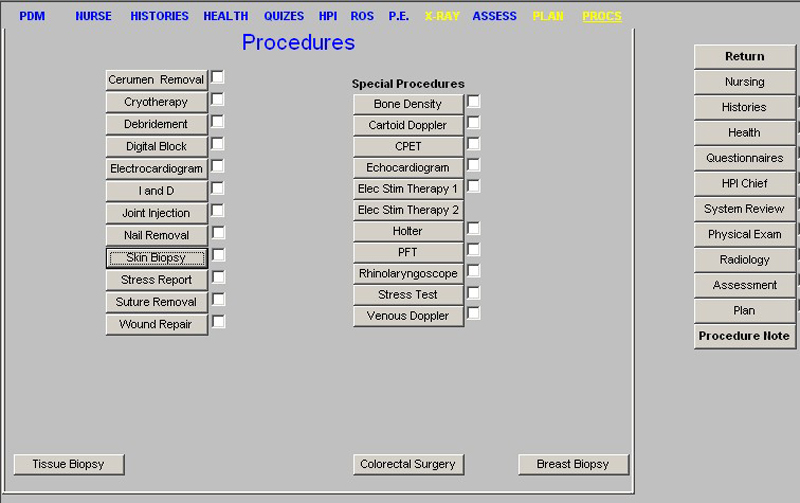
Once the procedure has been documented in each of these functions, the Document button at the bottom of SETMA’s Navigation Buttons should be clicked. This creates the document for these procedures.
|